I’ve been thinking for a good six months about the right way to convey this topic in a meaningful and understandable way. Unfortunately, the topic of graphic formats is more complex than many people initially think, and the right formats also change over the course of the production pipeline. For this reason, I have now decided to divide the topic into three parts:
The reason for this division is relatively simple: the correct format depends on the respective requirements.
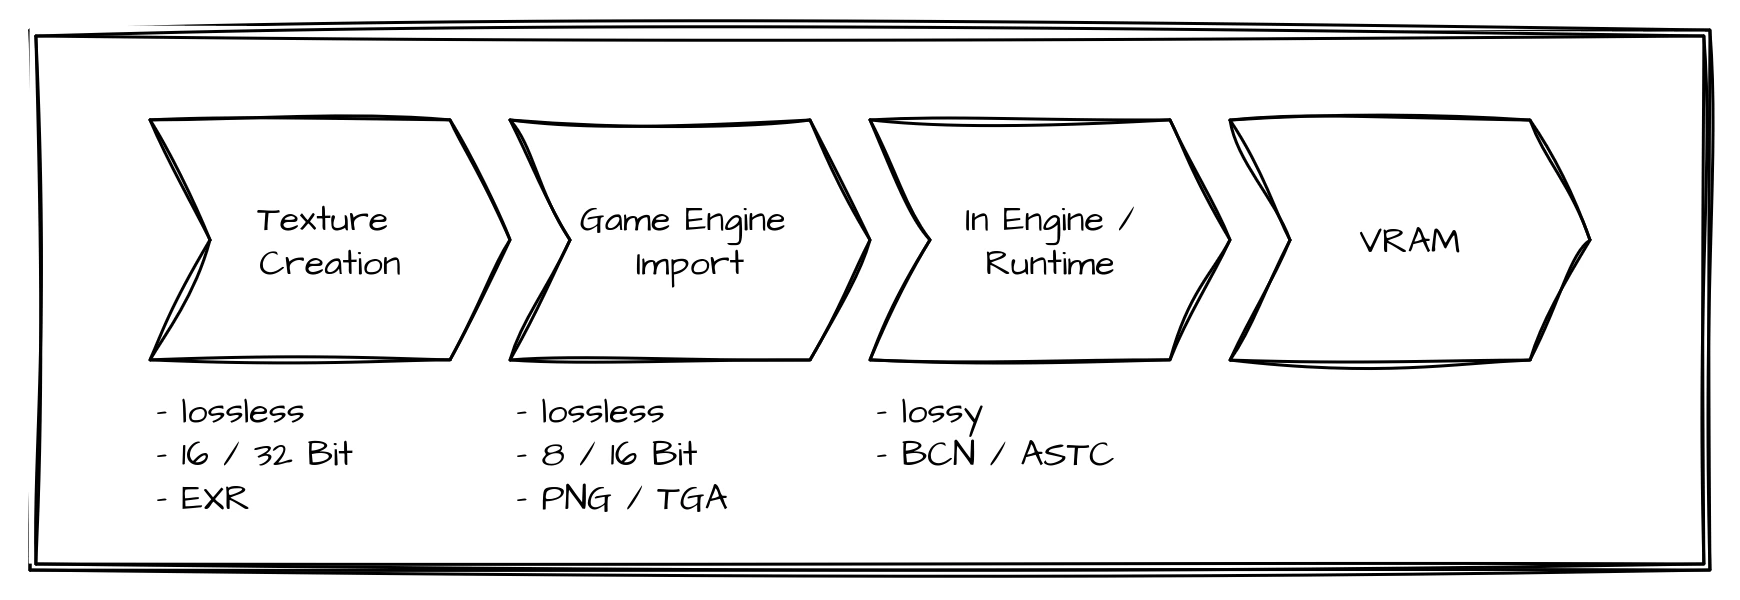
From texture creation to engine import to GPU runtime
Phase 1: Working phase
Within this phase—I’ve simply called it the working phase, as artists usually spend most of their time here creating assets—the textures are also usually created. Since we’re talking about textures here, let’s just assume that any 3D models have already been modeled. The exact procedure depends, of course, on the individual workflows of the studios or individuals, but often several programs are involved, unless you are working exclusively with procedural material. Here, we will use an example workflow that can be found in practice in this or a similar form:
- Export the finished high- and low-poly models from the DCC
- Bake and export various maps (normal, curvature, etc.) in Marmoset Toolbag
- Import the low-poly model and the previously created maps into Adobe Substance 3D Painter
- Create the textures in Adobe Substance 3D Painter
- Export the final textures for the game engine
When switching between programs during texturing, between 2 and 3 in this example, you should make sure to choose a graphics format as the exchange format that preserves as many details as possible. The old saying “better safe than sorry” applies here. Many people are probably thinking, “I use PNG anyway, it’s a lossless format”. That’s true, but PNG supports 8 and 16 bits per channel, but not floating point, so HDR is not possible, which could limit us at this point. That’s true, but PNG has only supported HDR content since the latest published specification (June 2025), so at this point I would assume that PNG support for HDR content is limited (see addendum). For this reason, I would like to suggest OpenEXR (.exr). This is a graphics format that is often used in CGI and VFX and supports up to 32-bit float per color channel in extreme cases. EXR allows for much finer transitions than PNG, meaning that even the smallest details can be preserved, making EXR the ideal exchange format during texturing.
Phase 2: Import into the game engine
Many of you will have noticed that in step 5 of the workflow described above, you also have to decide which file format to use for the final textures. And that is exactly what we want to look at in this section.
At this stage, the work should be complete. This means we don’t need to save any information for possible editing. Our goal now is to export the final textures so that they can be imported and interpreted by the game engine with as few errors as possible. For this reason, we rely on graphic formats that offer lossless compression, but limit the content to the information that is actually necessary for rendering, which is usually 8 bits per channel. The standard format here is often PNG. PNG is a good format in this case, but it is not undisputed for all textures. The reason for this is, on the one hand, that PNG can also contain so-called “rendering intents” and, on the other hand, that there can be a problem with transparencies. If rendering intents are set incorrectly and interpreted by the game engine, we may have to manually correct the interpreted values in the game engine after import. If you want to avoid these problems, TGA is a good option. TGA stores raw pixel values without color management or metadata, making it robust for engine imports. Transparency in TGA is controlled via a separate alpha channel, so that, unlike PNG, nothing can be misinterpreted. These texture files are then only pure import containers, as the engines internally store the textures in platform-specific compressed formats after import.
In addition to the file format, the correct color space interpretation (sRGB vs. Linear) is crucial for the subsequent rendering result. The only textures that should normally be interpreted as sRGB are the albedo/base color textures. All other typical textures (normal, roughness, metalness, AO, etc.) should be interpreted linearly, as they are not displayed directly but serve as a basis for calculations.
Phase 3: In the engine and at runtime
Up until this point, we have primarily focused on obtaining data and details and importing everything into the game engine as well as possible and without any loss. Therefore, storage space and storage efficiency were initially of secondary importance. And we haven’t given any thought yet to whether it is possible to load only certain parts of the textures with the existing graphics formats. But that is changing now, because we are starting to optimize our textures at runtime, and different rules apply here. More specifically, the rules of the GPU 🐲 apply here.
There are graphics formats that are specially optimized for GPUs, which offer the great advantage of being very memory-efficient and can be decoded directly on the GPU. This means that there is special hardware within the GPUs that decodes the image data, which is faster and more efficient than software and also ensures that less data is sent from the CPU to the GPU. In addition, these formats also have direct support for mipmaps. However, these advantages also come with a disadvantage that we have avoided so far: this storage efficiency is achieved through lossy compression. The graphics formats are generally block compression formats, i.e., the image is divided into individual blocks (e.g., 4x4) and each of these blocks is encoded individually. This makes it possible to load only certain blocks of a texture. In practice, there are two format families:
There is a relatively clear distinction between PC/console and mobile. In the classic DirectX PC ecosystem, BCn remains the standard, while ASTC is primarily used in the mobile and ARM environment (e.g., Apple). The reason for this can be found in history. BCn, then known as S3 Texture Compression (S3TC), was introduced in 1998 and has been part of DirectX and OpenGL (and now Vulkan, of course) ever since. That’s why GPU manufacturers started integrating suitable hardware into their GPUs at an early stage. ASTC was only introduced in 2012 and is significantly more flexible than BCn, but by that time, BCn was already so widespread that ASTC had no chance in the PC and console market, as GPU manufacturers were (apparently) unwilling to upgrade their GPUs with suitable hardware for ASTC. The situation is significantly different in the mobile segment. Since this market was still very young in 2012 and the performance of chips has been improving dramatically every year, most mobile GPU vendors now offer support for ASTC.
Before we dive into the depths of the individual codecs, I would like to point out a summary that does not involve any mathematics and provides a few guidelines on when which codec might be the right one.
BCn
BCn (BC1 - BC7) are all based on the same basic principle. The image is divided into 4x4 texel blocks, and each block is compressed separately. The assumption here is that the variance between the individual pixels within a 4x4 texel block is relatively small, so that it should be possible to interpolate the colors of the individual pixels in such a way that the compression artifacts are no longer noticeable.
The respective codecs are designed to achieve a constant memory size per block. This allows direct access to individual blocks, as it is easy to calculate which block is located at which memory location. How exactly the blocks are compressed depends on the specific codec.
In the following examples, we use 8-bit RGB or 8-bit RGBA as the source format, i.e., each pixel requires 3 or 4 bytes uncompressed, so that an entire 4x4 texel block uncompressed has a memory consumption of 48 bytes (RGB) or 64 bytes (RGBA).
BC1
- Block size: 8 Byte
- 2 Byte:
c0as RGB565 - 2 Byte:
c1as RGB565 - 4 Byte: Indextabelle (16 * 2 Bit)
- 2 Byte:
Each 4x4 texel block compressed with BC1 occupies 8 bytes. The first step in compression is to find two colors that represent the color spectrum of the entire block as well as possible. These colors, called c0 and c1, are stored as RGB565, i.e., 5 bits each for the red and blue channels and 6 bits for the green channel, which ensures that c0 and c1 only require 2 bytes each.
Then, two additional colors (c2 and c3) are temporarily calculated from c0 and c1. In practice, two different methods are used for this calculation:
- \(\text{c2} = \frac{2}{3} \text{c0} + \frac{1}{3} \text{c1},\; \text{c3} = \frac{1}{3} \text{c0} + \frac{2}{3} \text{c1} \)
- \(\text{c2} = \frac{5}{8} \text{c0} + \frac{3}{8} \text{c1},\; \text{c3} = \frac{3}{8} \text{c0} + \frac{5}{8} \text{c1} \)
Most implementations use the first variant, although NVIDIA appears to use the second variant (source). As a result, the results may vary slightly depending on the implementation. Different algorithms for converting back from RGB565 to RGB888 can cause further differences with different GPUs.
We then check each pixel in the texel block to see which of the four colors is most similar and store the index of the color with the greatest match in an index table. This means that the index table has 16 entries of 2 bits each, so that the entire table occupies 4 bytes.
The correct choice of c0 and c1 is essential, as you can easily imagine. That is why there are various implementations for this.
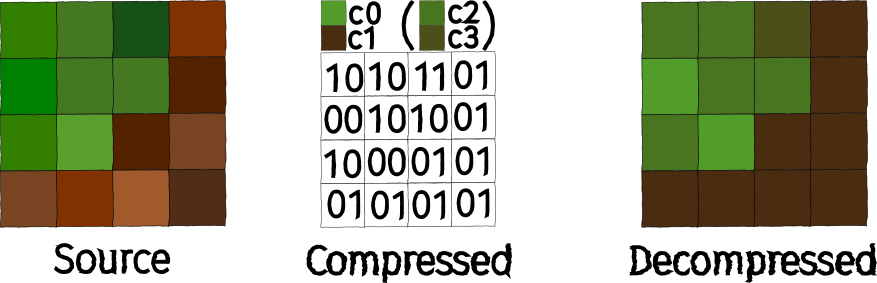
BC1 example
At first glance, the difference between Source and Decompressed may seem significant, especially since I chose c0 and c1 based on gut feeling. But take a look at the comparison in original size:

In general, four comparisons can be seen in the graphic. The original block is always on the left and the BC1 block is on the right:
- 4x4 texel block in original size
- 4x4 texel block in original size, but with 4 repetitions both vertically and horizontally
- 4x4 texel block in quadruple resolution
- 4x4 texel block in quadruple resolution, but with 4 repetitions both vertically and horizontally
In theory, BC1 also has a mode that can store 1 bit as transparency per pixel, i.e., pixels can be either transparent or opaque. In practice, however, you should use one of the other codecs if the alpha channel is required.
BC2 / BC3
- Block size: 16 Byte
- RGB: 8 Byte (see BC1)
- Alpha: 8 Byte
BC2 and BC3 are very similar. Both extend BC1 to support alpha.
In BC2, 4 bits are stored for each of the explicit pixels.
In BC3, alpha is stored with its own interpolation table, which enables significantly better transitions. This interpolation table works similarly to the color index table in BC1. Instead of color values in RGB565, 2 alpha values are stored per texel block, each with 1 byte. The remaining 6 bytes are used for the interpolation table, which means \(6\, \text{byte} / 16 = 3\, \text{bit}\) per table entry. This supports up to 8 different alpha values per texel block.
BC4
- Block size: 8 Byte
The implementation of BC4 is identical to the procedure used with the alpha channel of BC3. This means that there are also 2 stored colors/grayscale values (1 byte each) and an index table with 3 bits per pixel, supporting 8 different values per 4x4 texel block. This makes BC4 perfect for 1-channel textures (grayscale) such as height maps.
BC5
- Block size: 16 Byte
BC5 simply consists of two BC4 blocks stored one after the other. BC5 is therefore suitable for textures with two independent channels, making it the ideal format for normal maps, as the third channel (B or Z) can be reconstructed in the shader (\(z = \pm \sqrt{1 - x^2 - y^2}\)).
BC6H & BC7
The factors that limit the result of BC1 the most are:
- Low bit depth of RGB565, especially the uneven distribution of bits per channel, causes color shifts, particularly in grayscale
- Only 4 possible colors per texel block are supported
- All colors lie on a line in the RGB spectrum, since
c2andc3are interpolated fromc0andc1
These potential problems are to be solved with BC6H and BC7, which were introduced with DirectX 11. To do this, modes specified by the codec are used, which allow for more flexible use of memory. Depending on the mode, there is a trade-off between the precision of the stored colors and the number of possible intermediate color values. As a result, optimal compression becomes significantly more complex, but compression artifacts are minimized.
BC6H
- Block size: 16 Byte
BC6H is intended as an HDR format and stores the RGB values as FP16. A total of 14 different modes are available, which can be found, for example, here.
BC7
- Block size: 16 Byte
BC7 is currently BCn’s highest-quality codec for RGBA. It supports eight different modes that divide the 4x4 texel block into up to three subregions (subsets), with two color values stored for each subregion, between which interpolation takes place. The treatment of alpha also depends on the selected mode. An overview of all available modes can be found, for example, here.
ASTC
Adaptive Scalable Texture Compression (ASTC) was a joint development by ARM and AMD, introduced in 2012. LDR and HDR are supported as 2D or 3D textures. At first glance, the general procedure is very similar to BC6H / BC7, i.e., there are predefined modes that specify different partitions, but the difference lies in the details. ASTC can operate with different block sizes from 4x4 to 12x12 (2D) or from 3x3x3 to 6x6x6.
Another difference is that ASTC uses Bounded Integer Sequence Encoding (BISE). This is a special encoding method for efficiently encoding integers of a fixed number range. The problem with binary numbers is that they can be stored most efficiently in their binary representation if the number range to be encoded is a power of two, i.e., \(\log_2\) yields a smooth result.
However, if we are dealing with the number range \(0 - 9\), i.e., \(10\) values, we ideally need \(\log_2(10) = 3.32\) bits to store all values as compactly as possible. But \(3.32\) bits cannot be represented in this way, of course. This means that at least 4 bits must be used. If you now want to store 3 numbers in the number range \(0 - 9\), you would normally need \(3 * 4\,\text{bits} = 12\,\text{bits}\). However, if you combine them with BISE, \(3 * \log_2(10) = 9.97 \), i.e. 10 bits, is sufficient.
Recommendations
In the PC and console sector, there isn’t really much choice when it comes to graphics formats, as BCn is unavoidable if you want hardware support. This makes choosing the right codec all the more important:
| Format | Channels | Bytes/Block | Features |
|---|---|---|---|
| BC1 | RGB(+1 bit alpha) | 8 | Base format, simple |
| BC2 | RGBA | 16 | BC1 + explicit alphas |
| BC3 | RGBA | 16 | BC1 + interpolated alphas |
| BC4 | 1 Channel | 8 | Monochrome / Grayscale |
| BC5 | 2 Channels | 16 | Normal maps / Masks |
| BC6H | HDR RGB | 16 | FP16 HDR |
| BC7 | RGBA | 16 | Highest Quality |
The situation is different in the mobile sector. There are older format families such as ETC and PVRTC, some of which still have broader hardware support, or of course ASTC, which is currently the most flexible and powerful format.
Conclusion & Outlook
I hope that while reading this article, each of you has realized that the right graphics format always depends on the specific use case:
- In Phase 1, you try to preserve as many details as possible when switching between programs
- In Phase 2, the aim is to transfer the desired level of detail into the game engine as effectively as possible.
- In Phase 3, the aim is to maintain the level of detail as efficiently as possible at runtime, which means making some compromises.
For Phase 2 in particular, AVIF will be a very interesting candidate in the future, but it currently still needs some time to gain broader tool and engine support.
In Phase 3 ASTC is a very powerful format, which unfortunately currently lacks hardware support in the PC and console sector. It is to be hoped that GPU manufacturers will return to their roots and finally (re)introduce hardware support for ASTC in the coming years.
If there is interest, I would be happy to explain how to configure the appropriate settings in the respective game engines in another article. Just let me know if you would be interested in that.