
As announced at the end of the last article, in this article we will look at how to use the Unreal Engine on Linux. I am also very pleased 😊 to have heard from various sources that there are people looking forward to this article. We will start with the precompiled version, i.e., the binary version, and then work our way forward step by step to ultimately compile the Unreal Engine itself. Of course, we will also look at the limitations under Linux and possible workarounds for compatibility issues.
Before we really get started, here is the usual overview of all articles in this series published so far:
- Linux? What the penguin!?
- Basic installation of the Linux distribution
- Installation of native Linux software
- Installing Windows software on Linux
- Gaming on Linux
- Unreal Engine on Linux
Restrictions under Linux
First, here is an overview of the severe limitations when using Unreal Engine on Linux:
Unlike Windows, cross-compilation is limited on Linux. While Windows allows compilation for almost every supported platform except MacOS and iOS, Linux only allows compilation for Linux itself and Android. At least, that’s what my research has shown so far, but I’m happy to be proven wrong.
Only Vulkan is available as an RHI (Rendering Hardware Interface), more specifically Vulkan Desktop (SM5), Vulkan Desktop (SM6), and Vulkan Mobile (ES3.1).
Incompatibilities with third-party plugins may occur.
If any of these points cause problems for you, unfortunately you will not be able to use Unreal Engine on Linux.
Precompiled version
This is probably the starting point for most hobby developers. You could also market it as: Download, “Install”, and get started. Epic Games has been kind enough to provide an official precompiled version since the release of Unreal Engine 5. Of course, you need a free Epic developer account for this, but you generally need one if you want to work with Unreal Engine. Once you’re logged in, you’ll see a list of all versions available for download and can download them. The size of the zip archive varies between ~20 GB and ~30 GB, depending on the version.
After downloading, you can extract the zip archive to any location. I use my ~/dev folder for this, where I have a subfolder for each installed UE version, e.g., ~/dev/UE-5.7.1 for Unreal Engine 5.7.1. The Unreal Engine is then started by the Unreal Editor, whose executable file is “hidden” under Engine/Binaries/Linux/UnrealEditor. This opens the familiar interface for creating new projects, which is also used in Windows. From here on, everything should work the same as in Windows.
To have direct access to the assets from Fab.com, you need to install the appropriate plugin. It can be downloaded from the same page as Unreal. The contents of the zip archive can now be easily unzipped into the main folder of the Unreal Engine. The plugin should now be automatically active in every Unreal project, allowing you to start the corresponding browser under Window -> Fab.
Version 5.7 includes an upgrade to SDL-3, which currently still has a few compatibility issues with Wayland, which we will take a closer look at under Problems with SDL3 . But hopefully the rest of the troubleshooting section will also be of interest.
Compiling Unreal ourselves
There can be various reasons why Epic’s precompiled version of the Unreal Engine is not sufficient for your needs. Whether it’s retrofitted functionalities or performance optimizations, there can be many reasons to customize the Unreal Engine to suit your own requirements. To do this on Linux, there is also an official guide, which I have used as the basis for the rest of this section.
In general, it should be noted that this method of using UE places higher demands on the hardware than the method using the precompiled version. If you have less than 32 GB of RAM, you shouldn’t even try. The main reason for this, in my opinion, is that you don’t always want to compile with the best optimization for faster development, and when it comes to debugging, you can’t necessarily do so.
Interestingly, the documentation also includes the PC specifications of a typical system at Epic for development with Unreal Engine 5 on Linux:
- OS: Ubuntu 22.04
- Processor: AMD Ryzen Threadripper Pro 3975WX Processor - 128MB Cache, 3.5 GHz base / 4.2 GHz turbo, 32 Cores / 64 Threads, 280 W TDP
- RAM: 128GB DDR4-3200
- GPU: Nvidia RTX 3080 - 10GB
- Storage:
- OS: 1 TB M.2 NVMe3 x4 PCI-e SSD
- Data: 4 TB Raid Array - 2 x 2TB NVMe3 x4 PCI-e SSD in Raid 0
My own hardware can’t compete with the processor or RAM size, but with at least 32 GB of RAM and a reasonably powerful processor, there shouldn’t be any major problems. And, of course, you need sufficient storage space. In my tests for this article, my folder ended up being a good 225 GB in size.
The first step is to clone Unreal’s Git repository (https://github.com/EpicGames/UnrealEngine). If you don’t have access to the Git repository yet, you’ll need a free Epic account and then link it to your GitHub account:
- Create a GitHub account (https://github.com/) if you don’t already have one.
- Log in to the Unreal Engine website (https://www.unrealengine.com) and navigate to Account Settings (https://www.unrealengine.com/account/personal).
- Go to the Linked Accounts tab and link your GitHub account to your Epic account.
- Once you have linked your accounts and authorized EpicGames on GitHub (you should be prompted to do so automatically), you will receive an email from GitHub inviting you to join the @EpicGames organization.
- If you accept this invitation, you will gain access to the Git repository.
If you find these instructions too brief, you can also refer to the official instructions.
After successfully cloning the repository, the next step is to run the Setup.sh script, which is located directly at the top level of the repository. This script, which currently consists of 90 lines, is primarily concerned with downloading and storing all dependencies and storing the script for the dependencies as Git hooks for post-checkout and post-merge. Ultimately, this involves calling the executable file GitDependencies appropriate for the OS (e.g., Engine/Binaries/DotNET/GitDependencies/linux-x64/GitDependencies), which then downloads another 29 GB of data. To prevent this download from having to start from scratch every time a checkout or merge is performed, .git/ue-gitdeps is used as a cache. This means that the first time it is run, it may take a while.
The next step is to set up the toolchain appropriately. Epic has kindly created a script for this as well, so all we have to do is go to the subfolder Engine/Build/BatchFiles/Linux and run the script SetupToolchain.sh. This script currently has 98 lines in the Linux version and downloads an archive containing a Linux version of Clang from Epic’s CDN and unpacks it under Extras/ThirdPartyNotUE/SDKs/HostLinux/Linux_x64. (Interestingly, it is cached under .git/ue4-sdks.)
Before we can start compiling, we still need to generate the project files or the solution, as it would be called in Visual Studio. To do this, we go to the subfolder Engine/Build/BatchFiles/Linux and execute GenerateProjectFiles.sh. We can then specify the desired development environment as a command line argument so that the appropriate project files are generated. It took me some detective work to find out which transfer parameters are actually possible, but I finally found the relevant information in the file Engine/Source/Programs/UnrealBuildTool/Modes/GenerateProjectFilesMode.cs. The following are supported:
- Make (
-Makefile) - CMake (
-CMakefile) - QMake (
-QMakefile) - KDevelop (
-KDevelopfile) - CodeLite (
-CodeLitefiles) - VisualStudio (
-VisualStudio) - VisualStudio2022 (
-2022) - VisualStudioWorkspace (
-VSWorkspace) - XCode (
-XCodeProjectFiles) - Eddie (
-EddieProjectFiles) - VisualStudioCode (
-VSCode) - CLion (
-CLion) - Rider (
-Rider) - AndroidStudio (
-AndroidStudio)
Now we can open the created project in the development environment of our choice and then start the task “Launch UnrealEditor (<FLAG>)”, where <FLAG> corresponds to the desired optimization level.
Once the task has been successfully completed, which may take some time depending on the selected optimization level and your CPU, there will now be an executable file called UnrealEditor-Linux-<FLAG> under Engine/Binaries/Linux/, which you can use to start the self-compiled version of UnrealEngine.
Troubleshooting
High CPU load when idle
Sometimes, when you start Unreal Editor, it can unexpectedly put a lot of strain on your PC, even though you’re not doing anything particularly demanding in Unreal Editor. If you ever have this feeling, you could take a look at which process is causing the strain. A good way to do this is with htop, which we briefly looked at in the last article. If you see that there is a process called EpicWebHelper that is generating a lot of load, you can terminate it without hesitation.
It doesn’t happen every time you start up, but every now and then this process runs amok, and so far I haven’t noticed any negative effects when I’ve terminated it.
Issues with SDL3 (UE 5.7.x)
As mentioned at the beginning, the upgrade to SDL-3 has caused a few compatibility issues with Wayland. This is particularly inconvenient, as Wayland is becoming increasingly widespread and is now the standard for most distributions. But we wouldn’t be using Linux if there weren’t resourceful people who had developed suitable workarounds. I am not one of these resourceful people, but rather a beneficiary, as I was fortunate enough to find the relevant thread.
The most important fix is to start the Unreal Editor with the environment variable SDL_VIDEODRIVER=x11 to instruct SDL to start the window with X11 instead of Wayland. If you omit this and the Unreal Editor starts with Wayland, unfortunately all pop-ups, including all (sub)menus, are currently placed in the center of the screen.
The second, also very annoying, problem is that each tooltip is counted as a separate window. As a result, if you want to click on something that generates a tooltip via mouseover, you have to click twice, because each tooltip steals the focus when it appears. To address this issue, the following workarounds are currently available:
Disabling tooltips (radical): Add the following lines to the
Config\DefaultEngine.inifile:[SystemSettings] Slate.EnableTooltips=FalseDelaying the tooltips (not quite as radically): For a delay of 2 seconds, you can add the following lines to the file
Config\DefaultEngine.ini:[SystemSettings] Slate.TooltipSummonDelay=2.0Creating your own “window rule”: Thanks to the high degree of customizability of Linux desktop environments, you can usually work around the problem without changing the behavior of the Unreal tooltips. This is because many desktop environments offer the option of defining your own rules for window behavior. This makes it possible to configure the environment so that the tooltips no longer steal focus from the Unreal Editor. The following example is for Plasma/KDE, but many alternative desktop environments offer similar functionality. To do this, go to
System Settings->Window Management->Window Rules->+ Add New...and create a new window rule with the following parameters:- Window class (application): UnrealEditor
- Window types: All, but “Normal Window”
- Focus stealing prevention: Force / Extreme
- Focus protection: Force / None
- Accept focus: Force / No
For a better understanding, here is a screenshot of such a rule:
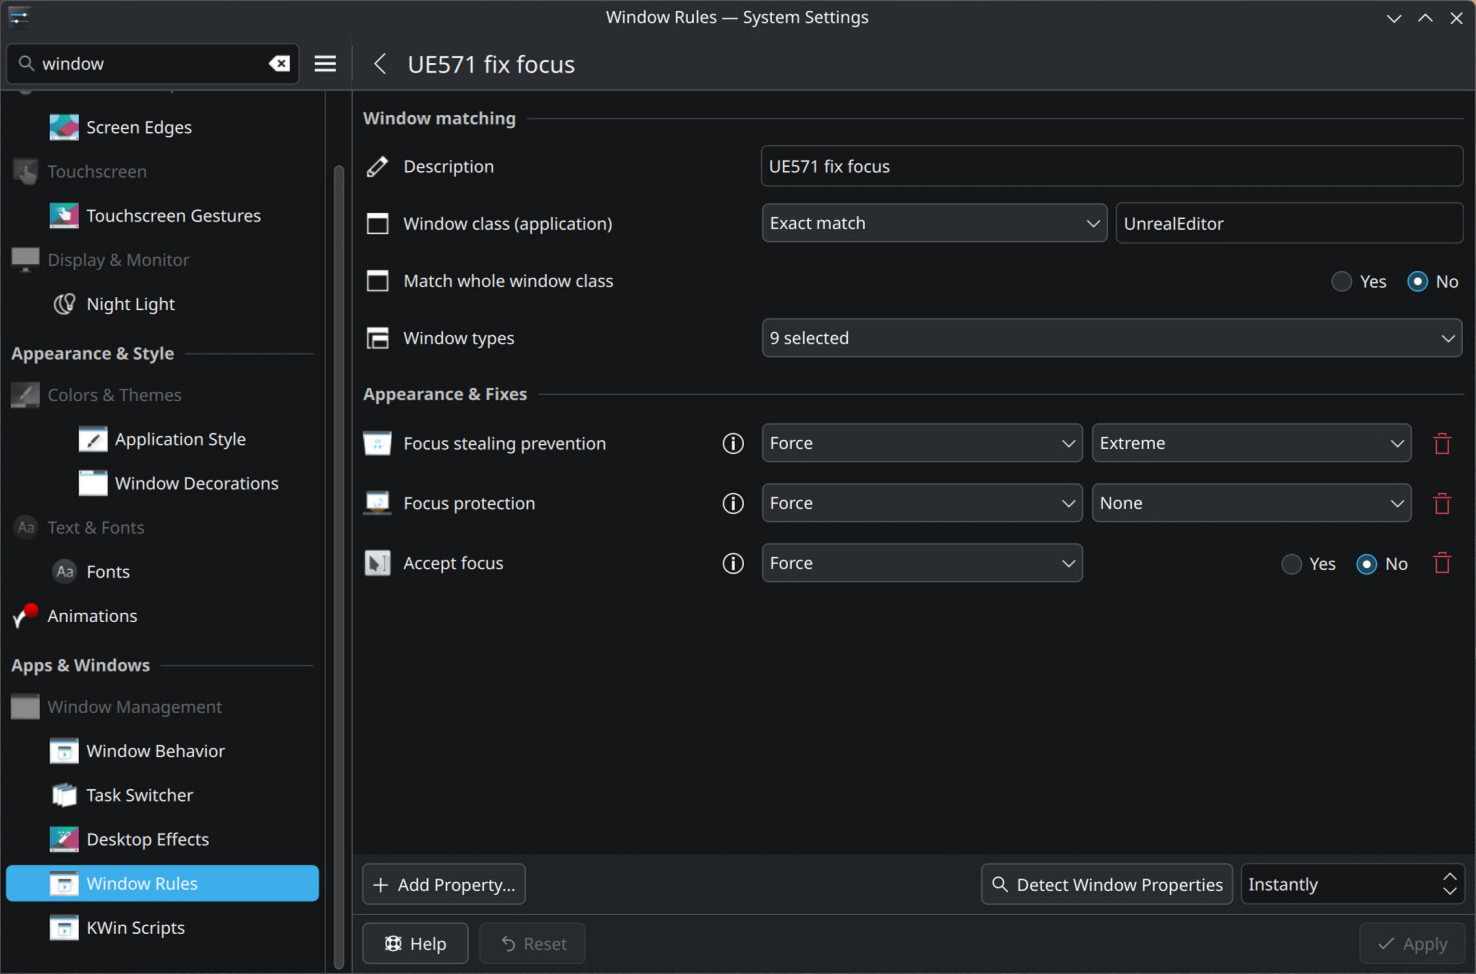
Plasma / KDE Window Rules for UE 5.7
Make StarterContent available again
With version 5.7, Epic seems to have decided to no longer include StarterContent. This shouldn’t really be a big problem, as much of the StarterContent is now quite outdated, but I find it very useful when I just want to quickly test something. To be able to use the StarterContent in 5.7, we first need an older version of the Unreal Engine, e.g., 5.6.1. From the older Unreal version, we then copy the Samples folder to the main folder of 5.7 and then copy the FeaturePacks/StarterContent.upack file to the FeaturePacks folder of 5.7. After restarting the Unreal Editor, we can now add the StarterContent as usual via the Content Browser: +Add (or right-click in the Content Browser). -> Add Feature oder Content Pack... -> Content -> Starter Content -> Add to Project.
Conclusion & Outlook
I hope you enjoyed this article. I’m not yet sure which topic I’ll be exploring in the next article in this series, but perhaps I’ll show you what I consider to be a very convenient backup solution.