
For this article I would like to apologize in advance that the positions of text and images are not always quite coherent. Unfortunately I couldn’t think of a better positioning, but I hope you can cope with it. After the tutorial series, which offers a good basic framework, today’s tutorial is about a topic that you can really see. The example shown here is based on a blog post by Fabio Alessandrelli, one of the main developers for the Godot network functionality. And since I don’t want to just copy everything, here’s how you can also use the techniques shown there when using path-dependent MultiplayerAPIs.
Today we want to deal with Scene Replication. With this term one describes the task of sending the current game scenery, thus for example level, player positions, etc., to all connected GameClients. In this way, an attempt is made to provide all GameClients with an (as far as possible) identical picture of the current game events. There are, as so often, different approaches to this. To keep the cheating potential as low as possible, network games should always use authoritative servers. This means that the GameClient is “dumb” and only registers inputs, sends them to the server and otherwise displays the game scenery transmitted by the server. All calculations regarding position changes, actions and their effects etc. are done by the server.
Godot 4 provides two new high-level components that allow us to perform Scene Replication without having to worry about the underlying RPC communication:
- MultiplayerSynchronizer
- Synchronizes specified properties (e.g. position data) between network participants. The default value for the synchronization interval is variable and corresponds to the current game FPS. So if you want to have a fixed tick rate like in many first person shooters (e.g. Counter-Strike: Global Offensive) you have to configure this via “Replication Interval” on each
MultiplayerSynchronizeror centrally in the project settings. - MultiplayerSpawner
- Replicates spawnable nodes from the network authority, in our case the server, to the other network participants, in our case all clients.
As an example, throughout the article, the GameClient and WorldServer will be extended so that a game character appears for each connected GameClient and can be controlled by the associated GameClient. To keep the example as simple as possible, the control is based on the “Basic Movement” template of CharacterBody3D, so that the characters can move left, right, forward and backward and also jump.
But before we really start, the following result video should motivate a bit:
The Player scene
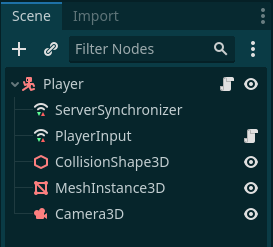
Structure of the Player scene
The player scene, as you can see in the accompanying screenshot, is actually quite simple in structure. Our top node is a CharacterBody3D, as is probably the case in every 3D Godot project for the player character. Accordingly there are as children, as felt in every second example, a CollisionShape3D with CapsuleShape3D as Shape and a MeshInstance3D with CapsuleMesh as Mesh. Almost all default settings are left, only as position, below Transform, we use (0, 1, 0) as vector, so that nothing hangs in the ground. Additionally there is a Camera3D, which serves as the player camera. The exact values of the camera are not so important for the tutorial, you should only be able to see something of the environment next to the player character. The player scene exists in the GameClient as well as in the WorldServer, just like the respective scripts.
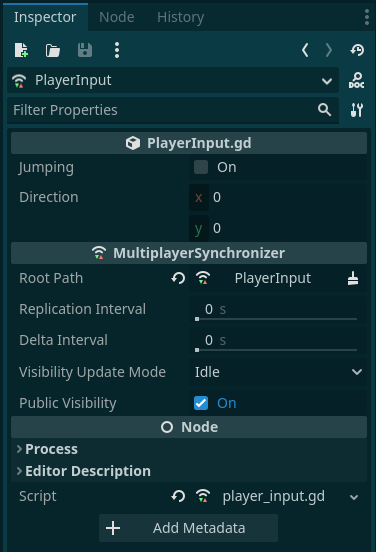
PlayerInput configuration
Next, let’s look at the two new nodes “ServerSynchronizer” and “PlayerInput”. These are nodes of the type MultiplayerSynchronizer, and they take over the synchronization of properties from us. It can be determined for each MultiplayerSynchronizer individually whether one would like to use e.g. a deviating synchronization interval.
The PlayerInput Node
The task of “PlayerInput” is to intercept the input of the respective player in the GameClient to send it to the server. This can be seen in the properties of PlayerInput.gd, which we will have a closer look at in the script. The RootPath is PlayerInput, because the GameClient should only be allowed to send input data within (and below) this node, since the results should be calculated by the server.
As you can see in the screenshot of the corresponding replication tab, a property called direction is synchronized via Sync. This property contains the input vector of the player or GameClient and should be used by the server to calculate the speed and the position.

Replication tab of PlayerInput
In general, with Spawn, Sync and Watch you have three possible settings to influence the synchronization. Spawn synchronizes the property directly at spawning, i.e. during the insertion of the node into the scene. Sync synchronizes the property at the configured interval. Watch synchronizes the property reliably at the configured interval if the property has changed.
Now we come to the associated script player_input.gd. As mentioned before, all possible player inputs are read there and then sent to the server. For the intended input possibilities the two variables jumping and direction are sufficient. jumping indicates whether the player should jump, and direction as Vector2 contains the direction of the player’s movement.
In line 8 within the _ready() function it is determined whether the “PlayerInput” node should be active or not. Of course, the node should only be active if it is the PlayerInput node of the active GameClient, because otherwise you would control all other game characters at the same time as well. Within the _process() function we determine the input for direction, for this we use the function Input.get_vector() to get the appropriate Vector2 value directly. The jump input is realized by calling the jump() function as RPC, which is not only executed on the server but also locally thanks to @rpc("call_local").
 1extends MultiplayerSynchronizer
 2
 3@export var jumping := false
 4@export var direction := Vector2()
 5
 6
 7func _ready() -> void:
 8	set_process(get_multiplayer_authority() == multiplayer.get_unique_id())
 9
10
11func _process(delta: float) -> void:
12	direction = Input.get_vector("ui_left", "ui_right", "ui_up", "ui_down")
13	if Input.is_action_just_pressed("ui_accept"):
14		jump.rpc()
15
16
17@rpc("call_local")
18func jump():
19	jumping = true
The Player Script
After looking at how the input data is collected and sent to the server, let’s look at its processing in the player.gd script attached to our main player node. The property declaration should look pretty ordinary, except for the player property or the associated setter. This value is set by the server when it is created, and then in the setter we set the passed ID as MultiplayerAuthority for our PlayerInput node. This allows us, as shown in the previous section, to make the check in the _ready() function of the PlayerInput node whether the script should be executed or not.
 1extends CharacterBody3D
 2
 3
 4const SPEED = 5.0
 5const JUMP_VELOCITY = 4.5
 6
 7# Get the gravity from the project settings to be synced with RigidBody nodes.
 8var gravity: float = ProjectSettings.get_setting("physics/3d/default_gravity")
 9
10# Set by server (authority), synchronized on spawn
11@export var player := 1:
12	set(id):
13		player = id
14		$PlayerInput.set_multiplayer_authority(id)
15
16@onready var input = $PlayerInput
In the _ready() function we check if the GameClient is responsible for the game character. If it is responsible, we set Camera3D as the current camera.
Within _physics_process() the processing of the input data takes place as usual, only that these do not have to be determined first, but are already prepared thanks to the MultiplayerSynchronizer in input.direction.
19func _ready() -> void:
20	if player == multiplayer.get_unique_id():
21		$Camera3D.current = true
22
23
24func _physics_process(delta: float) -> void:
25	# Add the gravity.
26	if not is_on_floor():
27		velocity.y -= gravity * delta
28
29	# Handle Jump.
30	if input.jumping and is_on_floor():
31		velocity.y = JUMP_VELOCITY
32	input.jumping = false
33
34	var direction := (transform.basis * Vector3(input.direction.x, 0, input.direction.y)).normalized()
35	if direction:
36		velocity.x = direction.x * SPEED
37		velocity.z = direction.z * SPEED
38	else:
39		velocity.x = move_toward(velocity.x, 0, SPEED)
40		velocity.z = move_toward(velocity.z, 0, SPEED)
41
42	move_and_slide()
The ServerSynchronizer Node
ServerSynchronizer configuration
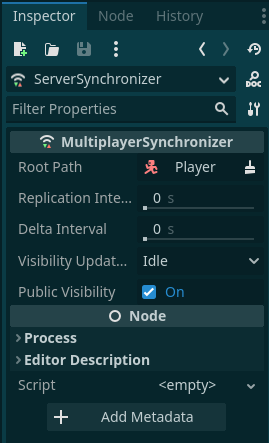
Now that the actual movement of the game character has taken place in the player script, the relevant result data must be replicated from the server to all connected GameClients. We do this with the help of the “ServerSynchronizer”. Since this synchronizer works directly with the properties of our player node, the player node is also stored as Root Path. All other options remain at their default values. As you can see in the following screenshot of the corresponding replication tab, three values are transmitted using this node: player, position and velocity.
player is the unique multiplayer ID of the GameClient, which is assigned by the server as soon as a new player is spawned. position and velocity are the well-known Vector3 values from Node3D and CharacterBody3D respectively, which contain the current position and the current velocity. Both position and velocity are to be synchronized not only at node creation (during spawn), but also periodically at runtime.

Replication tab of ServerSynchronizer
This concludes the discussion of the player scene so far. Our game is now able to collect input data on the GameClients at runtime, process them on the server and then send the relevant result data back to the GameClients. The only problem is, how do the respective instances of the player scene get into the game?
The Level scene
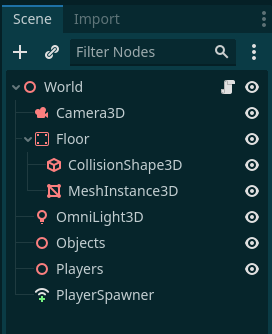
Structure of the Level scene
In the accompanying screenshot you can see the structure of my level scene. It is kept as simple as possible, so that we can concentrate on the essentials. Therefore there is only one floor, which has a PlaneMesh with 25mx25m as MeshInstance3D as child. The other child CollisionShape3D is a WorldBoundaryShape3D, so no GameClient can fall down anywhere. The OmniLight3D provides some light, the exact values are not important for this example. The Objects and Players are empty containers, where objects or game characters should be spawned into. Last but not least there is the PlayerSpawner. This is the second high-level component MultiplayerSpawner for scene replication. This PlayerSpawner is responsible for the fact that all GameClients notice it, if a new game character is spawned. To achieve this, the PlayerSpawner must first be configured correctly.
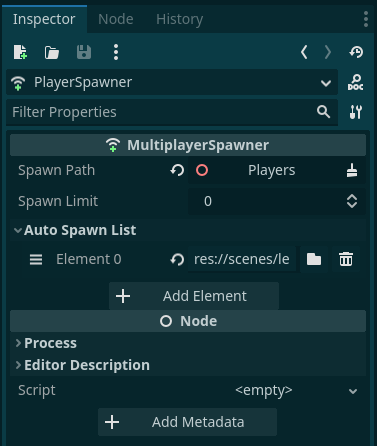
PlayerSpawner configuration
As we can see in the accompanying screenshot of the Inspector from the PlayerSpawner node, there are two properties that we need to adjust in order to achieve the desired result. First, the Spawn Path must be set to the Players node. This configuration has the effect that now the Players node is monitored. As soon as an instance of an element of the Auto Spawn List appears as a direct child of the Players node, this is communicated to all GameClients, so that the PlayerSpawner nodes there can also create a suitably instantiated child node. So now, in order for our spawner to replicate instances of the player scene, this scene must be added to the Auto Spawn List.
The structure of the level scene is (almost) identical on the GameClient and the WorldServer. The WorldServer additionally has an active script that controls the addition and removal of game characters when GameClients connect or disconnect. For this purpose, in the associated _ready() function, the add_player() and del_player() functions are connected to the associated signals. In _exit_tree() we clean up 😉 of course and stop eavesdropping on the signals.
 1extends Node3D
 2
 3const SPAWN_RANDOM := 5.0
 4
 5@onready var players := $Players
 6
 7
 8func _ready() -> void:
 9	for id in multiplayer.get_peers():
10		add_player(id)
11	get_multiplayer().peer_connected.connect(add_player)
12	get_multiplayer().peer_disconnected.connect(del_player)
13
14func _exit_tree():
15	get_multiplayer().peer_connected.disconnect(add_player)
16	get_multiplayer().peer_disconnected.disconnect(del_player)
The function add_player() has the task of instantiating the player scene appropriately and then adding it to the players node as a direct child. To do this, we first instantiate the actual player scene, of course, and store the passed network ID of the associated GameClient in the player property. Then, using some random magic, we create a starting position, name the node after the network ID, and add it to the players node.
20func add_player(id: int) -> void:
21	var character := preload("res://scenes/levels/player.tscn").instantiate()
22	character.player = id
23	# Randomize character position
24	var pos := Vector2.from_angle(randf() * 2 * PI)
25	character.position = Vector3(pos.x * SPAWN_RANDOM * randf(), 0, pos.y * SPAWN_RANDOM * randf())
26	character.name = str(id)
27	players.add_child(character, true)
Should a GameClient terminate the connection, the function del_player() is called. There it tests if there is a node below the player node with the name of the passed network ID. If so, it will be deleted.
30func del_player(id: int):
31	if not players.has_node(str(id)):
32		return
33	players.get_node(str(id)).queue_free()
Thanks to properly configured PlayerSpawner, the added or removed player scene nodes below the Players node are automatically replicated to all GameClients. So now GameClients can connect/disconnect dynamically, and all other GameClients get this. Congratulations to all who have taken their own example project 👏 because now everything essential has been shown. To all others I also congratulate 👏, but am additionally pleased that we may now integrate everything still in the example project from the tutorial series.
Integration into the sample project from the tutorial series
To recap, the sample project from the tutorial series consists of a total of 4 components - AuthenticationServer, GatewayServer, WorldServer and GameClient. Authentication and GatewayServer are involved exclusively during login, which is already completed when a game character is to be created and linked to a GameClient. Therefore, we do not need to make any adjustments there and can continue to ignore them, as we have done so far in this article.
Integration into the WorldServer
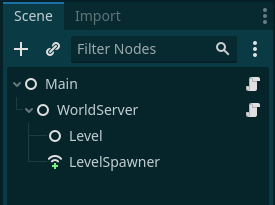
Structure of the Main scene
Let us first take care of the Main scene of the WorldServer. There the WorldServer node gets two children. Once Level as parent node of the level to be loaded. And then another node called LevelSpawner, which is of type MultiplayerSpawner and should replicate the loaded level. Therefore we select the sibling node Level as Spawn Path, set a Spawn Limit of 1, because we want to have a maximum of one level replicated and add our level scene to the Auto Spawn List. This limit is purely for security, since our script only instantiates one level scene.
The script main.gd, which belongs to the Main node, has to be slightly extended. The previous functionality, which configures the custom network path and starts the server, must now be adapted so that it loads our level scene as soon as the server is started.
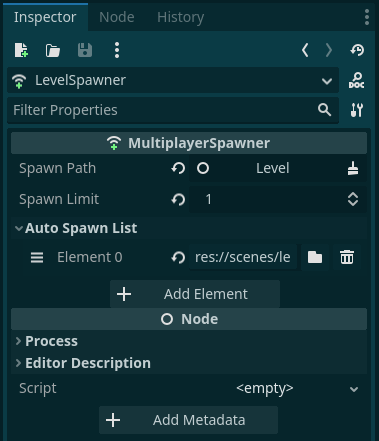
LevelSpawner configuration
To achieve this, we create a new function change_level() (from line 14), which gets the scene to be loaded as parameter. To support different level scenes in the future and at the same time ensure that only one is active at a time, we delete possible other scenes or nodes below the level node. Then we add the instantiated scene to the level node as a child.
It is important that the scene is not loaded until the server is started. Otherwise, our LevelSpawner would already try to replicate the level, which would result in errors as long as no network connection is started. Therefore we link the call of change_level() with the signal started of our server. We bind the scene to be loaded directly to the callable of change_level.
Now only the signal started of our network server is missing, so that everything works smoothly. This is a signal which is emitted after the call of create_server if the return value is OK. In order not to worsen the clarity of this article even more, I have omitted these two lines. But of course you can find them in the corresponding Github repository.
 1extends Node
 2
 3@onready var world_server := $WorldServer
 4@onready var spawner := $WorldServer/LevelSpawner
 5@onready var level := $WorldServer/Level
 6
 7func _ready() -> void:
 8	get_tree().set_multiplayer(SceneMultiplayer.new(),
 9		^"/root/Main/WorldServer")
10	world_server.started.connect(change_level.bind(
11		load("res://scenes/levels/level.tscn")))
12	world_server.startup()
13
14func change_level(scene: PackedScene):
15	# Remove old level if any.
16	for c in level.get_children():
17		level.remove_child(c)
18		c.queue_free()
19	# Add new level.
20	level.add_child(scene.instantiate())
Integration into the GameClient
The challenge for the integration into the GameClient is to rebuild the structure of the main scene of the WorldServer in the GameClient after we have received a logintoken from the GatewayServer, but before we contact the WorldServer with the logintoken. For this reason, we need to extend the _login_callback() function in the main.gd script of the GameClient. To make the context easier to understand, I have displayed the entire function in the code block below and highlighted the new lines. The function is called when we received a response from the GatewayServer in the GameClient. If the response was positive, so we also got a login token, we want to contact the WorldServer. For this we create the WorldServer node, link the associated script, store a new instance of MultiplayerAPI for the WorldServer node and the necessary data or the callback.
Now comes the extension: We rebuild the structure of the main scene of the WorldServer. To do this, we have to add a Node called Level and a MultiplayerSpawner called LevelSpawner below the WorldServer node. Additionally, we need to configure our LevelSpawner appropriately (lines 20-22).
 1func _login_callback(return_code: int, token: String) -> void:
 2	gateway_server.queue_free()
 3	gateway_server = null
 4	if return_code == OK:
 5		print("Current Token is: %s" % token)
 6		world_server = Node.new()
 7		world_server.name = "WorldServer"
 8		add_child(world_server)
 9		world_server.set_script(load("res://scenes/network/world_server.gd"))
10		get_tree().set_multiplayer(SceneMultiplayer.new(), ^"/root/Main/WorldServer")
11		world_server.world_server = world_server_data
12		world_server.callback = _world_server_callback
13
14		var levelNode = Node.new()
15		levelNode.name = "Level"
16		world_server.add_child(levelNode)
17		var levelSpawner := MultiplayerSpawner.new()
18		levelSpawner.name = "LevelSpawner"
19		world_server.add_child(levelSpawner)
20		levelSpawner.spawn_path = levelNode.get_path()
21		levelSpawner.spawn_limit = 1
22		levelSpawner.add_spawnable_scene("res://scenes/levels/level.tscn")
23
24		world_server.login_to_server(token)
25	else :
26		print("Something went wrong…")
27		get_node("LoginScreen").reset()
Once these changes are made, nothing should stand in the way of the test run. I hope I didn’t forget anything and it was understandable so far. Otherwise you can find the finished project in the usual Github repository.