The source code to the articles can be found in this GitHub repository. The following list shows all articles of this series published so far:
- Networking tutorial 1: General information and overview
- Networking tutorial 2: The "walking skeleton"
- Networking tutorial 3: Login 1 - The game client
- Networking tutorial 4: Login 2 - gateway and authentication server
- Networking tutorial 5: Login 3 - world server
- Networking tutorial 6: Encrypted connections using DTLS
In the last article we completed the login process. However, before using it in real life, we should first secure our network connections. The least one should do and, if I understand the GDPR correctly, must do, is to transmit user passwords only using encrypted channels on the Internet. Ideally, one extends encrypted communication to the entire infrastructure. So that’s what this article is going to be about: We encrypt the network connections between our servers and clients.
To prove that currently the passwords are really transmitted as plaintext, I intercepted a login packet between client and gateway server using Wireshark in the following image. As you can see in the right part of the excerpt, the login was attempted with the username “my_username” and the password “my_secret_password”.
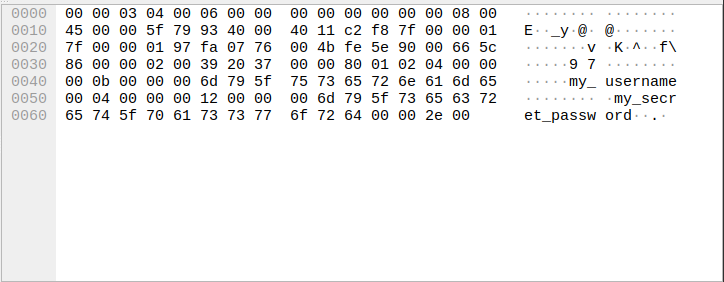
Network dump with unencrypted password transfer
But even if the protection of the own users would not be reason enough, there is also another good reason: the protection against proxy attacks. This refers to all attacks or fraud attempts that can be implemented with the help of network proxies. In this case, the network proxy analyzes the network packets between the game client and server. If the proxy detected something, e.g. an opponent, it could change the network packets of the game client in such a way that the game server believes that the user of the game client would attack the opponent. This is a kind of machine-in-the-middle attack that is initiated and desired by the user of the game client itself, e.g. to gain superhuman reflexes. However, this type of attack only works if the network connections are not encrypted.
DTLS
DTLS stands for Datagram Transport Layer Security and is, in simple terms, TLS for UDP. In turn, everyone should know TLS from their browser by now, because if the address line begins with https or a lock is displayed there, the connection is encrypted with the help of TLS. You can imagine TLS as if a tunnel is established between client and server, all (plaintext) data flows through the tunnel and outsiders only see gibberish when looking at the tunnel, because the tunnel walls encrypt all data. This means that once this tunnel is established, the client and server continue to communicate unencrypted for themselves, but anyone listening in will only hear the encrypted communication.
Generally, new versions of DTLS are always specified some years after the respective TLS version. I couldn’t find out yet which version is used by Godot, but as soon as I know, I will tell you. Generally Godot 4.0.2 uses for (D)TLS internally the library mbedtls 2.18.2, which supports DTLS 1.0 and 1.2.
Creating the certificates
(D)TLS uses digital public-key certificates for encryption. Without going into further detail about X.509, such a public-key certificate is almost like an RSA key pair, which we have already used for token generation, except that the public-key certificate also contains other information in addition to the public key, such as the issuer, validity period and information about the owner.
On the WWW, it is common to use TLS certificates issued by “recognized” certification authorities (CAs). The actual certificate is signed by a certification authority in order to increase confidentiality. In practice, this then sometimes results in certificate chains because the certificate with which the certification authority signed was in turn signed by another certification authority. “Recognized” means that the software, in practice usually the browser, trusts this CA or the “parent” CA. Firefox, for example, uses its own database for this purpose, while most other browsers rely on the database of the operating system. Thanks to Let’s Encrypt this is also free and convenient. An example of such a certificate chain can be seen e.g. on this SSL Report from Qualys SSL Labs, where a server delivering this website has been tested for known TLS vulnerabilities.
As long as we only use things locally for testing, we can save going through certificate authorities and use “self-signed” certificates instead. There are many ways to generate self-signed certificates. Under Linux, for example, openssl is a good choice:
openssl req -x509 -newkey rsa:4096 -sha256 -days 365 -nodes \
			-keyout authentication_server.key \
			-out authentication_server.crt
Thus we create an X.509 certificate with a 4096-bit RSA key and SHA256 hash values, which is valid for 365 days and does not use a passphrase for the key (-nodes). The private key should be named authentication_server.key and the certificate authentication_server.crt. For the generation we also ask for some general information which is necessary for regular certificates. Since we currently only want to use these certificates locally for testing, the information is irrelevant for now.
Alternatively, you can create a small Godot application yourself that generates certificates independent of the operating system. A rudimentary example can be found with Godot 3.2.3 here in the tutorial by Game Development Center aka Stefan.
All in all we need certificates for the authentication, gateway and world server.
Enable DTLS in Godot
Now that we have all the necessary certificates, we “only” need to enable DTLS in our Godot projects. In order not to drag out this article unnecessarily and bore you, I will show it exemplarily for a server and a client. As server I take the Authentication-Server and as client the Gateway-Server. Since we have made the structure of the projects as identical as possible so far, the necessary steps should be transferable to the other projects without any problems, and in case of need you can also look in the GitHub Repository.
Enable DTLS on the “server” (authentication_server/scenes/network/authentication_server.gd)
I have placed both the certificate and the associated private key in the crypto directory, where in the case of the authentication server the RSA key pair for the token is already located. The directory has also already been added to the .gitignore file as an exception for security reasons, since in my opinion certificates and keys basically do not belong in a version control system.
Then we extend the server script, so in this exemplary case: authentication_server/scenes/network/authentication_server.gd. First we load our private key and the certificate:
7const dtls_key := preload("res://crypto/authentication_server.key")
8const dtls_cert := preload("res://crypto/authentication_server.crt")
After that we have to extend our startup() function minimally to enable DTLS (line 31). So that the single necessary line is not listed completely without context, I have also copied in a few lines before and after it, even if these lines come from earlier articles.
27func startup() -> void:
28	var network := ENetMultiplayerPeer.new()
29	var ret := network.create_server(network_port, max_clients)
30	if ret == OK:
31		network.host.dtls_server_setup(TLSOptions.server(dtls_key, dtls_cert))
32		multiplayer.server_relay = false
33		multiplayer.set_multiplayer_peer(network)
34		...
DTLS is enabled at the ENetConnection level, which we reach via the host attribute of our ENetMultiplayerPeer. As parameters TLSOptions are passed, and since these options cannot be instantiated directly, there are matching static factory methods that do the correct instantiation for us. Since we want to enable DTLS on the server here, we naturally choose the static method server().
Enable DTLS on the “client” (gateway_server/scenes/network/authentication_server.gd)
With the gateway server as the DTLS client of the authentication server, we also need to extend our startup() function to enable DTLS (line 18). Again, I’ve added a few lines before and after this to make the context more obvious:
12func startup() -> void:
13	print("Connecting to %s:%d" % [authentication_server, authentication_server_port])
14	var ret = network.create_client(authentication_server, authentication_server_port)
15	var _hash := _crypto.hmac_digest(HashingContext.HASH_SHA256, shared_secret,
16			Time.get_date_string_from_system(true).to_utf8_buffer())
17	if ret == OK:
18		network.host.dtls_client_setup("localhost", TLSOptions.client_unsafe())
19		multiplayer.multiplayer_peer = network
20		...
It is also true on the client that DTLS is enabled at the ENetConnection level, which we reach via the host attribute of our ENetMultiplayerPeer. The first parameter passed to dtls_client_setup() is the hostname of the server. Since I am running everything locally on a single PC in this tutorial series, my hostname is “localhost”. The second parameter passed is also TLSOptions, only this time we use the static function client_unsafe(). The client_unsafe() function to initialize TLSOptions should be used for testing purposes only, as this disables certificate checking.
In a production scenario, one would instead use the client() function and either use a certificate from a “recognized” certificate authority or create one’s own CA whose certificate chain one can pass as a parameter to the function. It is also important to mention here that the certificates must be renewed in a timely manner and, if necessary, clients must also be updated if something has changed in the certificate chain.
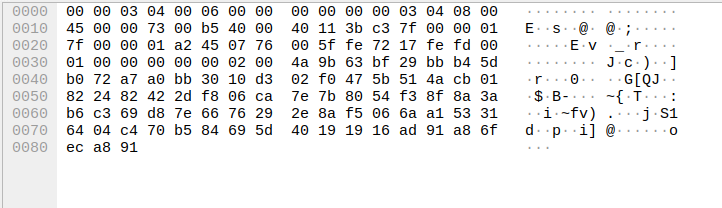
Verify the encrypted connection
After performing the steps for all our Godot projects, communication should continue to work as usual, and you shouldn’t really notice that our connections are now encrypted. However, to verify that the connection is now really encrypted, I repeated my initial test and recorded the communication between the game client and the gateway server using Wireshark. What was the login data this time?