
The source code for this tutorial series can be found in this GitHub repository. The following list shows all articles of this series published so far:
- Networking tutorial 1: General information and overview
- Networking tutorial 2: The "walking skeleton"
- Networking tutorial 3: Login 1 - The game client
- Networking tutorial 4: Login 2 - gateway and authentication server
- Networking tutorial 5: Login 3 - world server
- Networking tutorial 6: Encrypted connections using DTLS
In the last article we created the game client to the point where it wants to contact the gateway server with login data. In this article, we will continue at this exact point and take care of the gateway server and authentication server. However, before we can take care of the actual login process, we first have to make the gateway and authentication servers familiar with each other and make sure that they trust each other. We use a mechanism that allows mutual authentication already during the connection setup and that was only introduced in Godot 4 in November 2022.
Pre-Authentication
The author of the pull request talks about pre-authentication, because the authentication already happens during the connection setup, while in the game client we sent the login data only after we are already connected to the gateway server, i.e. we got the signal connected_to_server. Despite a short description in the pull request, I had to experiment a bit to get the desired behavior working. I first thought that only the client authenticates itself to the server, but it is a mutual authentication, and only when both parties have agreed to the connection, it is actually established.
To enable pre-authentication, we have to set the auth_callback in the SceneMultiplayer object on both sides with a callable, which contains the authentication logic. In addition, during connection establishment we have so far only been interested in the connected_to_server and connection_failed signals as client and peer_connected and peer_disconnected as server, respectively. In the context of pre-authentication, we now additionally consider the two further signals peer_authenticating and peer_authentication_failed on both sides.
The peer_authenticating signal is emitted when a new connection is established and should be used to send the authentication-relevant data to the remote peer using send_auth(id: int, data: PackedByteArray). send_auth() then triggers the stored auth_callback at the remote peer to validate the sent data. The success case is then signaled complete_auth(id: int). If both parties have done this within 30 seconds, the network connection is finally established and communicated to the client using connected_to_server or to the server using peer_connected.
So, enough of the theory, here now the example code of the gateway server (client):
 1extends Node
 2
 3@export var authentication_server := "127.0.0.1"
 4@export_range(1025, 65536) var authentication_server_port := 1911
 5@export var shared_secret := "JustARandomValueYouCantGuess".to_utf8_buffer()
 6
 7var _crypto := Crypto.new()
 8var network := ENetMultiplayerPeer.new()
 9var shutdown_hook : Callable
10var gateway_server : Node
11
12
13func startup() -> void:
14	print("Connecting to %s:%d" % [authentication_server, authentication_server_port])
15	var ret = network.create_client(authentication_server, authentication_server_port)
16	var _hash := _crypto.hmac_digest(HashingContext.HASH_SHA256, shared_secret,
17			Time.get_date_string_from_system(true).to_utf8_buffer())
18	if ret == OK:
19		multiplayer.multiplayer_peer = network
20		multiplayer.connection_failed.connect(_on_connection_failed.bind(FAILED))
21
22		multiplayer.connected_to_server.connect(func() -> void:
23				print("Succesfully connected to authentication server %s:%d"
24						% [authentication_server, authentication_server_port]))
25
26        multiplayer.peer_authenticating.connect(func(server_id: int) -> void:
27				print("server_id %d peer_authenticating" % server_id)
28				if server_id == MultiplayerPeer.TARGET_PEER_SERVER:
29					multiplayer.send_auth(server_id, _hash))
30
31		multiplayer.peer_authentication_failed.connect(func(server_id: int) -> void:
32				print("server_id %d peer_authentication_failed" % server_id))
33
34		multiplayer.auth_callback = \
35				func(server_id: int, data: PackedByteArray) -> void:
36					print("server %d sent %s" % [server_id, data.hex_encode()])
37					if _crypto.constant_time_compare(_hash, data):
38						multiplayer.complete_auth(server_id)
39					else:
40						print("Validation was not successful")
41	else:
42 _on_connection_failed(ret)In the source code all previously mentioned places should be found. Authentication validation takes place using the current system date (UTC). With this (line 17) the gateway server creates a HMAC (line 16). The key must be identical on both servers for this. I used the current system date (UTC) because both servers only need approximately the same system time and it could only cause problems during the minutes around midnight. In practice, of course, it should be ensured that all servers have as accurate a system time as possible, so that you don’t do the check there on a daily basis, but on a minute basis. This makes replay attacks much more difficult to perform, since the generated HMAC changes every minute, and not just every day, as shown in the example.
The corresponding source code in the authentication server looks similar. The biggest difference is that new HMACs are generated for each request or validation, since it is unknown whether an older HMAC can still be valid:
 1extends Node
 2
 3@export_range(1025, 65536) var network_port := 1911
 4@export_range(2, 4095) var max_clients := 2
 5
 6@export var shared_secret := "JustARandomValueYouCantGuess".to_utf8_buffer()
 7var _crypto = Crypto.new()
 8var peers = []
 9
10
11func startup() -> void:
12	var network := ENetMultiplayerPeer.new()
13	var ret := network.create_server(network_port, max_clients)
14	if ret == OK:
15		multiplayer.server_relay = false
16		multiplayer.set_multiplayer_peer(network)
17		print("Server started on port %d, allowing max %d connections"
18				% [network_port, max_clients])
19
20		multiplayer.peer_connected.connect(
21				func(client_id: int) -> void:
22						print("Client %d connected" % client_id))
23
24		multiplayer.peer_disconnected.connect(
25				func(client_id: int) -> void:
26						print("Client %d disconnected" % client_id)
27						peers.erase(client_id))
28
29		multiplayer.peer_authenticating.connect(
30				func(client_id: int) -> void:
31						print("Client %d peer_authenticating" % client_id)
32						var _hash := _crypto.hmac_digest(HashingContext.HASH_SHA256,
33                        		shared_secret,
34                                Time.get_date_string_from_system(true).to_utf8_buffer())
35						multiplayer.send_auth(client_id, _hash))
36
37		multiplayer.peer_authentication_failed.connect(
38				func(client_id: int) -> void:
39						print("Client %d peer_authentication_failed" % client_id))
40
41		multiplayer.auth_callback = \
42				func(client_id: int, data: PackedByteArray) -> void:
43						print("Client %d sent: %s" % [client_id, data.hex_encode()])
44						var _hash := _crypto.hmac_digest(HashingContext.HASH_SHA256,
45								shared_secret,
46								Time.get_date_string_from_system(true).to_utf8_buffer())
47						if _crypto.constant_time_compare(_hash, data):
48							multiplayer.complete_auth(client_id)
49							peers.append(client_id)
50						else:
51							print("Validation was not successful")
52    else:
53		print("Error while starting server: %d" % ret)
54		get_tree().quit(ret)
Gateway-Server
Now that the gateway server and the authentication server can communicate with each other in a basic way and, more importantly, can trust each other, we start in this section to implement the actual task of the gateway server, which is to be machine-in-the-middle 😉 between the client and the authentication server.
Synchrone Loginsequenz
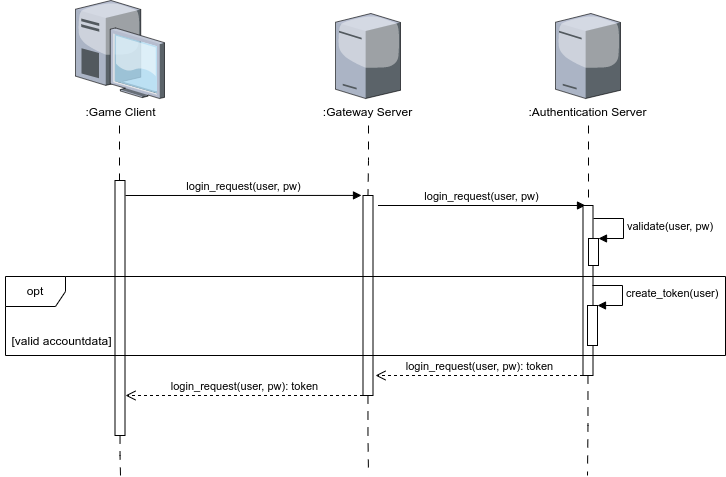
In the last article, we called the s_login_request() function on the gateway server as a game client with the entered login data. Thus, this is now our entry point. The sequence diagram for the synchronous login sequence is once again our model and we can see from the diagram that the next step is to forward the game client’s login request to the authentication server. To do this, we first implement the called function within gateway_server.gd of the gateway server:
48@rpc("call_remote", "any_peer", "reliable")
49func s_login_request(username: String, password: String) -> void:
50	var player_id := multiplayer.get_remote_sender_id()
51	print("login request received by %d" % player_id)
52	authentication_server.authenticate_player(username, password, player_id)
As we can see, besides a debug console output, the function authenticate_player() is called there within authentication_server.gd. The transmitted login data and the network ID of the game client are passed as parameters. This network ID is previously determined in line 50 by calling multiplayer.get_remote_sender_id(). As you can see in the code below, the call to authenticate_player() in authentication_server.gd actually only passes the passed parameters to the authentication server. The authentication server only needs the login data and not the network ID of the game client, but we still pass it through the authentication server so that we still know how to reach the game client when we later forward the response to it.
55func authenticate_player(username: String, password: String, player_id: int) -> void:
56	print("sending authentication request for player_id: %d" % player_id)
57	s_authenticate_player.rpc_id(MultiplayerPeer.TARGET_PEER_SERVER,
58			username, password, player_id)
59
60
61@rpc("call_remote", "any_peer", "reliable")
62func s_authenticate_player(_username: String, _password: String, _player_id: int) \
63 -> void:
64	pass # on authentication server
As shown in the sequence diagram and addressed in the previous paragraph, the gateway server also has the task of forwarding the authentication server’s response to the game client. For this purpose, the gateway server provides the c_authentication_result() function in authentication_server.gd. This function is then called by the authentication server via RPC. The result, the network ID of the game client and, if successful, a token are transmitted as parameters. As before, the gateway server has no logic of its own, but only acts as an intermediary between the game client and the authentication server. Therefore, in addition to debug console messages, only the return_login_request() function of gateway_server.gd is called with the received parameters (line 68).
65@rpc("call_remote", "authority", "reliable")
66func c_authentication_result(result: bool, player_id: int, token: String) -> void:
67	print("authentication result for player_id: %d is %s" % [player_id, str(result)])
68	gateway_server.return_login_request(result, token, player_id)
As expected, the return_login_request() function in gateway_server.gd forwards all parameters via RPC to the original game client (line 42). If there is still a connection to the game client after this RPC call, it will be disconnected as soon as all intended messages have actually been sent (lines 43-45). It may also happen in practice that the game client disconnects while the gateway server is in the process of executing line 199. In this case, line 200 results in an error message, which we can then ignore.
41func return_login_request(result: bool, token: String, player_id: int) -> void:
42	c_login_response.rpc_id(player_id, result, token)
43	var peer: ENetPacketPeer = multiplayer.multiplayer_peer.get_peer(player_id)
44	if peer != null:
45		peer.peer_disconnect_later()
With this, we have finished implementing the complete functionality of the gateway server.
Authentication-Server
The central task of our authentication server is the verification of transmitted login data. If the login data is valid, a token is generated which is accepted by the world server. As you can see in the following code snippet, I make my life a bit easier again by currently accepting all login data whose username and password match (line 73).
As we can see in line 78, no token is generated here yet, we will deal with this specifically in the next section. In line 79, the result, player_id (network ID of the game client) and a token are sent via RPC to the gateway server from which the request came.
69@rpc("call_remote", "any_peer", "reliable")
70func s_authenticate_player(username: String, password: String, player_id: int) -> void:
71	print("authentication requested for player_id: %d" % player_id)
72	var gateway_id := multiplayer.get_remote_sender_id()
73	var result = username == password # add real user accounts and real check
74	print("return authentication result (%s) for player_id: %d to gateway_id: %d"
75			% [str(result), player_id, gateway_id])
76	var token := ""
77	if result:
78		pass # Create Token
79	c_authentication_result.rpc_id(gateway_id, result, player_id, token)
Token generation
I’ve moved token generation to an extra section because I imagine not everyone is already familiar with JWTs, so I’d like to start a bit more general with the topic. JWT (pronounced “jot”) is short for JSON Web Token and is defined/standardized in RFC 7519. In RFC 7519 is the following short description for JWTs:
JSON Web Token (JWT) is a compact, URL-safe means of representing claims to be transferred between two parties. The claims in a JWT are encoded as a JSON object that is used as the payload of a JSON Web Signature (JWS) structure or as the plaintext of a JSON Web Encryption (JWE) structure, enabling the claims to be digitally signed or integrity protected with a Message Authentication Code (MAC) and/or encrypted.
We are thus dealing with a compact URL-secure way of transferring claims between two parties. The claims are encoded as JSON objects and can be used within JSON Web Signatures (JWS) or JSON Web Encryptions (JWE). We will use them as part of JSON Web Signatures and protect them from modification (more on that later). Claims are, quite abstractly, statements or assignments about a particular party or object and can be succinctly described as information. We thus have a standardized format for transferring information between two parties and can protect that information from change. This is exactly what we need to allow the game client to access the world server without the world server being able to verify the identity of the game client.
For protection against modification, we rely on the RSA SHA256 algorithm, so we generate a hash value of our claims using SHA256 and sign it using RSA. This has the advantage that we use two different keys for signing and signature verification by using the asymmetric RSA method. This means that even if the world server is compromised, i.e., stolen, hacked, etc., the authentication server remains the only party that can issue our tokens.
Basically, a JWT can be divided into three parts: Header, Payload and Signature, each separated by a .. The header and payload are encoded in Base64 URL so that there are no problems during transfer via HTTP. What information is contained in a JWT can be checked for example in the Debugger of jwt.io. If you want more information about JWT, you can read RFC 7519 or jwt.io or read an article I wrote about it years ago.
So, enough of the theory, let’s put it into practice. But before we can start, we have to add support for JWTs to the authentication server in the form of an AddOn. To do this, we first download the latest release for Godot 4 and unpack the folder addons into our Godot project of the Authentication Server. Afterwards we have to activate the add-on in the project settings -> plugins. To put everything into operation, we still need a key pair in PEM format. Since I work mostly under Linux, I use the appropriate Linux commands here, but with a short research you should also be able to find the appropriate commands for Windows:
authentication_server> mkdir crypto
authentication_server> cd crypto
authentication_server/crypto> ssh-keygen -t rsa -b 4096 -m pem -f jwt_rsa.key
authentication_server/crypto> ssh-keygen -f jwt_rsa.key.pub -e -m pem > jwt_rsa.pem
authentication_server/crypto> rm jwt_rsa.key.pubNow we are finally really ready to extend the authentication server with token generation. The first step is to create a central variable of type JWTAlgorithm (line 10), which we then initialize in _ready():
10var jwt_algorithm: JWTAlgorithm
11
12
13func _ready() -> void:
14	var private_key := CryptoKey.new()
15	var load_ret := private_key.load("res://crypto/jwt_rsa.key")
16	if load_ret == OK:
17		jwt_algorithm = JWTAlgorithm.new()
18		jwt_algorithm._private_crypto = private_key
19		jwt_algorithm._alg = JWTAlgorithm.Type.RSA256
20	else:
21		print("Error while reading RSA private key: %d" % load_ret)
22		get_tree().quit(load_ret)
Before we can initialize jwt_algorithm, we must first load our private key (lines 14-15). If this worked, we create a new object of type JWTAlgorithm (line 17) and initialize it with the private key and our chosen hashing/signing method (lines 18-19). If something went wrong while loading the private key, we terminate the authentication server, because it will not be able to generate tokens without a private key.
Now, to create a real token, we replace the previous pass of line 78 in s_authenticate_player() of the previous section, with the following lines:
78		var now := int(Time.get_unix_time_from_system())
79		token = JWT.create(jwt_algorithm) \
80					.with_issued_at(now) \
81					.with_expires_at(now + 30) \
82					.with_claim("acc", username) \
83					.sign(jwt_algorithm)
This generates a token with a validity of 30 seconds, which contains the account name of the authenticated game client in the acc claim. The game client thus has about 30 seconds to authenticate itself with the world server using this token, provided that the system times of the authentication and world servers are approximately the same.
The next step
The next article will be about the next step: The game client sends the received token to the world server, which validates the token and maintains the connection if successful.