The source code for this tutorial series can be found in this GitHub repository. The following list shows all articles of this series published so far:
- Networking tutorial 1: General information and overview
- Networking tutorial 2: The "walking skeleton"
- Networking tutorial 3: Login 1 - The game client
- Networking tutorial 4: Login 2 - gateway and authentication server
- Networking tutorial 5: Login 3 - world server
- Networking tutorial 6: Encrypted connections using DTLS
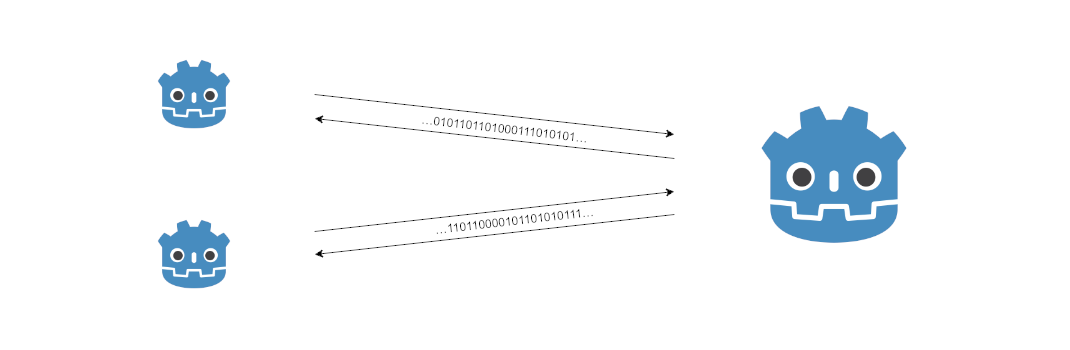
With the help of the last article, we now have a basic framework consisting of three servers running on UDP ports 1909-1911 and informing us via console output about connection establishment/disconnection of clients. This article deals with the first part of our login process and we create the game client to the point where it connects to the gateway server and sends the login data there. But before that we will discuss a bit more generally the login process and RPCs in Godot.
Login process
In classic synchronous software development, the planned login sequence would look like the sequence diagram below. Although synchronous programming is often more convenient for the developer, it achieves poor results for the user, especially for computationally intensive or latency-robust calls, i.e., whenever a network is involved. In addition, the network layer in Godot based on ENet is designed for asynchronous communication. This is because broadcasts are also supported, where the server can initiate a function call, a so-called Remote Procedure Call (RPC), to all currently connected clients. How long should such a call take then? Until all, i.e. up to 4k, clients have returned their result? Especially since one must additionally consider that with the Godot RPCs it can also be configured that such calls can be delivered unreliably, so there is no guarantee that a client has received the call or not.
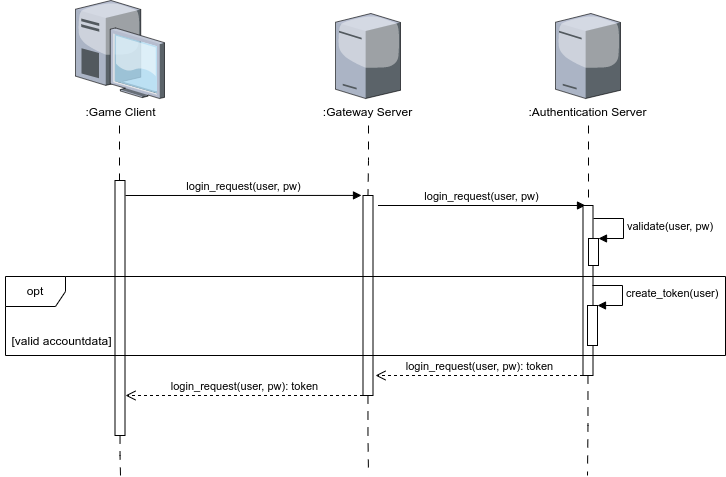
Synchrone Loginsequenz
For this reason, we take the synchronous sequence as a model and reproduce it asynchronously. This means that the respective RPCs take place as shown in the sequence diagram. The “waiting time” drawn in can now be used for other purposes. For example, the GUI of the game client can continue to respond to user input or display and update a progress bar. The gateway server can respond to further login requests in the same thread. The key is that the responses drawn in are now also RPCs and the gateway server must be able to forward the response to the original invoker.
Remote Procedure Call (RPC)
RPC-based communication, along with message-based communication, is a fundamental model of network programming. The beauty of it is that it is similar to a local function call for the developer. In the network layer of Godot ENet that we use, all RPC calls are asynchronous calls, so in general already functions with return value void. If one wants to have in synchronous way of thinking however a return value one must make likewise a function available, a so-called Callback, which the communication partner calls then with the result (synchronous: Return value) by RPC.
Between Godot 3.x and Godot 4 the syntax in the network area has changed a lot. I will only talk about the new syntax here, but if you want to have a look at the old syntax, you will surely find it in the old documentation. The first and biggest change is probably the new annotation @rpc for all functions that can be called via RPC.
@rpc("call_remote", "any_peer", "reliable")
func s_login_request(_username: String, _password: String) -> void:
	pass
Four parameters are provided for @rpc:
mode- Specifies who is allowed to call the function. Possible values are
"authority"(default) and"any_peer". sync- Determines whether the function is called remotely only or also locally. Possible values are
"call_remote"(default) and"call_local". transfer_mode- There are three possible modes in total.
unreliable(default) means that the function calls are sent without further guarantees. Withunreliable_orderedit can be specified that only the last message sent is evaluated, i.e. if A and then B are sent first and B arrives at the recipient before A, only B is evaluated and A is discarded. If A arrives before B, then of course A is evaluated first and B afterwards. Withreliablemechanisms are established to guarantee the arrival of the message/function call (a bit like TCP), which has the consequence that after eachreliabledispatch the receiver must acknowledge receipt before the nextreliablemessage can be sent on this channel. channel- Determines on which channel a message/function call takes place. All channels are part of the same network connection. The default value is
0, otherwise, as far as I can tell at the moment, all otherintvalues are allowed. By using different channels you can e.g. reduce latencies caused byreliablecalls by running differentreliablecalls over different channels. Otherwise, as explained before, eachreliablefunction call waits for the acknowledgement of the receiver before the nextreliablefunction call can be sent on the channel. Another essential use for different channels arises when using thetransfer_modeunreliable_ordered, because the sorting refers to all network messages of the channel and not only to the same function calls. As a result, if 3 different RPCs are sent withunreliable_orderedover the same channel, depending on the order of reception, 1 to a maximum of 3 of them will be executed and all those not executed will be discarded, even if each call should call a different function.
The order of the first three parameters does not matter, as shown in the example, but the channel must always be specified as the fourth argument.
More information and smaller examples on this topic can also be found in the related blog post of this syntax change.
A second syntax change that comes with Godot 4 is that each Callable now has the functions rpc() and rpc_id(). This allows the RPC to be called directly on the callable and you dont really need another general function anymore that has to be passed the function name by string. Thus renaming of functions is noticed directly at compile time and not only at runtime. The difference between rpc()andrpc_id()is thatrpc_id()` still specifies the network ID of the recipient. The new syntax in use then looks like this, for example:
# Neue Syntax:
s_login_request.rpc_id(MultiplayerPeer.TARGET_PEER_SERVER, username, password)

# Alternative/ bisherige Syntax:
rpc_id(MultiplayerPeer.TARGET_PEER_SERVER, "s_login_request", username, password)
Game client
Login GUI (./scenes/gui/login_screen.tscn)
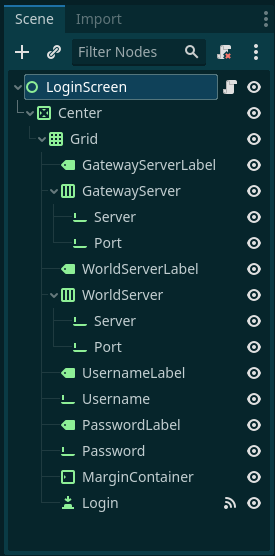
SceneTree der Login-GUI.
After a long inner struggle whether I should really build a login GUI, we are now starting with just such a GUI. First of all: My knowledge of GUI design, especially with Godot, is quite limited. I’m not interested in the most beautiful or best design for this GUI, but in a functionality as useful as possible for this tutorial. Therefore you can also set network address and port for gateway and world server in the GUI. As you can see from the SceneTree, I tried to fit as much functionality as possible into as little design as possible. I had only two criteria for the design: First, the GUI elements should be centered regardless of the window size. Second, labels and input fields (LineEdit) should be neatly placed below each other. With the help of CenterContainer the centering requirement can be implemented very easily, because this container centers all its Control children automatically. I solved my second criterion with a two-column GridContainer. For this to work as desired, the child elements must always alternate between Label and input field. To make sure that this also works for the input fields of the server entries, I combined the respective text fields (LineEdit) for network address and port in an HBoxContainer, so that the alternating order fits. To save me the typing effort, the text fields for gateway and world server are already preset to 127.0.0.1 and 1910 or 1909. The GUI then looks like this:
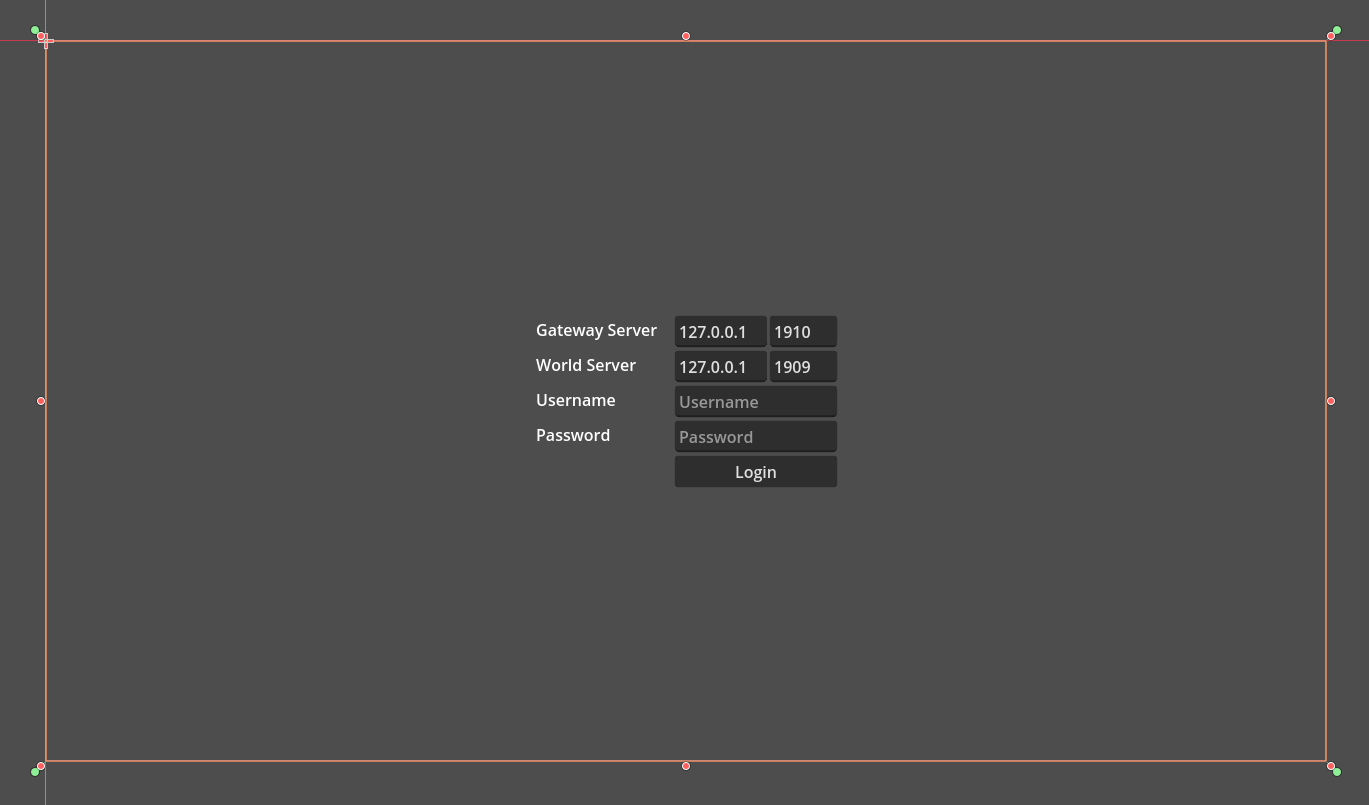
Login-GUI
Appropriately, the associated GDScript is also kept very simple. It has only two functions:
_on_login_pressed()which is connected to thepressedsignal of `login_btnreset(), which is supposed to reset the GUI
 1extends Control
 2
 3@onready var gw_server_addr_txt := $Center/Grid/GatewayServer/Server
 4@onready var gw_server_port_txt := $Center/Grid/GatewayServer/Port
 5@onready var world_server_addr_txt := $Center/Grid/WorldServer/Server
 6@onready var world_server_port_txt := $Center/Grid/WorldServer/Port
 7@onready var username_txt := $Center/Grid/Username
 8@onready var password_txt := $Center/Grid/Password
 9@onready var login_btn := $Center/Grid/Login
10
11var login : Callable
12
13
14func reset() -> void:
15	login_btn.disabled = false
16
17
18func _on_login_pressed() -> void:
19	login_btn.disabled = true
20	login.call(NetworkConnectionData.new(gw_server_addr_txt.text,
21			gw_server_port_txt.text as int),
22			NetworkConnectionData.new(world_server_addr_txt.text,
23			world_server_port_txt.text as int),
24 username_txt.text, password_txt.text)All the “magic” of this script takes place inside _on_login_pressed(). There, login_btn is first disabled (line 19) to prevent multiple presses. Then a callable named login is called with the contents of the input fields. What exactly is behind login, we will see in a moment. First I added a new class called NetworkConnectionData in ./scripts/classes/network_connection_data.gd. As you can see in the source code below, this is just a simple data container that is supposed to bundle network address and port and still has a _to_string() function to produce better console output:
 1class_name NetworkConnectionData
 2
 3var address: String
 4var port: int
 5
 6func _init(_address: String, _port: int) -> void:
 7	address = _address
 8	port = _port
 9
10func _to_string() -> String:
11	return "%s:%d" % [address, port]
SceneHandler (./scenes/main.tscn)
As mentioned briefly in the previous article, I want to design the startup scene (./scenes/main.tscn) of the game client as a SceneHandler. That is, the entire control flow of the game client is controlled via this scene and the associated GDScript. For this reason the necessary glue code is also to be found there, in order to accomplish the wiring of signals, Callbacks, dependencies etc.:
 1extends Node
 2
 3var login_screen := preload("res://scenes/gui/login_screen.tscn")
 4
 5var gateway_server : Node
 6var world_server_data : NetworkConnectionData
 7
 8
 9func _ready() -> void:
10	_load_login_screen()
11
12
13func _load_login_screen() -> void:
14	for c in get_children():
15		c.queue_free()
16	var instance = login_screen.instantiate()
17	instance.login = _login
18	add_child(instance)
When the game client is started, the function _load_login_screen() (line 10) is called in _ready(). The task of this function is to initialize and load the previously presented scene of the login GUI. Before this happens, however, it is “cleaned up”. To do this, all children of the scene are passed through in line 14 to preload them for deletion. Then the preloaded login_screen (line 3) is instantiated, the callback login is set and then the login GUI is added to the current SceneTree (line 18).
21func _login(gw_server: NetworkConnectionData, wrld_server: NetworkConnectionData,
22			username: String, password: String) -> void:
23	world_server_data = wrld_server
24	gateway_server = Node.new()
25	gateway_server.name = "GatewayServer"
26	add_child(gateway_server)
27	gateway_server.set_script(load("res://scenes/network/gateway_server.gd"))
28	get_tree().set_multiplayer(SceneMultiplayer.new(), ^"/root/Main/GatewayServer")
29	gateway_server.gateway_server = gw_server
30	gateway_server.callback = _login_callback
31	gateway_server.login_to_server(username, password)
As we have already seen in the section before, the passed callback _login() (line 21-22) is called with the data of all input fields of the login GUI . The network coordinates of the world server are stored in a local variable for later use, while all other information is processed directly. For this purpose, starting at line 24, a Node for the gateway server is created, named, added to the SceneTree and initialized. At the end, the function login_to_server() of the gateway server is called, which then establishes the network connection to the gateway server, which we will take a closer look at in the next section.
34func _login_callback(return_code: int, token: String) -> void:
35	remove_child(gateway_server)
36	if return_code == OK:
37		print("Login was successful")
38		print("Current Token is: %s" % token)
39		# Connect to World Server
40	else :
41		print("Something went wrong…")
42		get_node("LoginScreen").reset()
The function _login_callback() (from line 34) hosts the callback for the gateway server. There the node of the gateway server is deleted, because it is no longer needed. Afterwards, in case of success, a small message and the received token are currently output as console message. Later, with the help of the token, the contact to the world server should be established here, but we are not so far yet. In case of error, a small debug message is output and then the function reset() of the login GUI is called.
Gateway Server client (./scenes/network/gateway_server.gd)
The task of the gateway server client is, as you might guess, to communicate with the gateway server. It is brought to “life”, as we have already discussed, in the SceneHandler, where, after instantiation and initialization, the login_to_server() function is called.
 1extends Node
 2
 3var network := ENetMultiplayerPeer.new()
 4var gateway_server : NetworkConnectionData
 5var username : String
 6var password : String
 7var callback : Callable
 8
 9func login_to_server(_username: String, _password: String) -> void:
10	username = _username
11	password = _password
12
13	print("Connecting to %s" % gateway_server.to_string())
14	var ret = network.create_client(gateway_server.address, gateway_server.port)
15	if ret == OK:
16		get_multiplayer().multiplayer_peer = network
17		get_multiplayer().connected_to_server.connect(_on_connection_succeeded)
18		get_multiplayer().connection_failed.connect(_on_connection_failed.bind(FAILED))
19	else:
20		_on_connection_failed(ret)
To contact the gateway server, an ENet client is first created in line 14. If this was successful, similar to the last tutorial, the ENetMultiplayerPeer is stored in the Multiplayer object and the signals connected_to_server and connection_failed are linked. In case of an error the function _on_connection_failed() is called directly, where the error handling is triggered.
23func _on_connection_failed(ret: int) -> void:
24	print("Failed to connect to gateway server on %s, errorcode was %d"
25			% [gateway_server.to_string(), ret])
26	callback.call(ret, "")
The error handling in _on_connection_failed() is kept very minimalistic. A short console message is issued and then the callback that the SceneHandler had specified is called. This function is called not only when the network client generation fails, but also when the connection_failed signal is triggered.
29func _on_connection_succeeded() -> void:
30	print("Succesfully connected to gateway server %s" % [gateway_server.to_string()])
31	print("send login request to gateway server")
32	s_login_request.rpc_id(MultiplayerPeer.TARGET_PEER_SERVER, username, password)
33	username = ""
34	password = ""
35
36
37@rpc("call_remote", "any_peer", "reliable")
38func s_login_request(_username: String, _password: String) -> void:
39	pass # on gateway server
When _on_connection_succeeded() is called by connected_to_server after a successful connection to the gateway server, the actual login process takes place there. For this the function s_request_login is called in line 32 as RPC on the server. As parameter the function rpc_id() always has the numeric ID of the remote system in the first place. The server always has the ID 1, which is also available as constant MultiplayerPeer.TARGET_PEER_SERVER. All other parameters are passed to the called function.
As you can see from line 37, the s_login_request() function is also present in the client, even if it is called exclusively on the server. Besides identical network path and SceneTree, all functions available via RPC must also be present on server and client. All @rpc parameters, the function name and also the passing parameters (number and type) must be the same, whereas the implementations can and should be different. The server cannot care what the client does in its functions and vice versa is even more true. Such functionless implementations are often referred to as stubs. To be able to distinguish between server and client functions I currently start all server functions with s_ and all client functions with c_. Additionally, I try to make related communication flows visible by using functions with the same name, which then end with either _request or _response.
42@rpc("call_remote", "authority", "reliable")
43func c_login_response(result: bool, token: String) -> void:
44	print("login response is %s" % str(result))
45	print("token is '%s'" % token)
46	get_multiplayer().connected_to_server.disconnect(_on_connection_succeeded)
47	multiplayer.set_multiplayer_peer(null)
48	network = null
49	callback.call(OK if result else ERR_INVALID_DATA, token)
The c_login_result() function (line 43) is called by the gateway server in response to s_login_request(). After outputting debug console messages, the connection to the server is disconnected and the Callback is called with the result. From there on, it proceeds as previously shown in the SceneHandler. In case of error the login button will be unlocked again and in case of success there will be more console output, as I have planned the communication with the world server for a later tutorial.
The next step
The next article will deal with the next step: The gateway server receives the login request from the game client and forwards it to the authentication server, which verifies the login data and creates a token if successful. The result is then sent back to the game client via the gateway server.