
 Midjourney
The source code to the articles can be found in this GitHub repository. The following list shows all articles of this series published so far:
- Networking tutorial 1: General information and overview
- Networking tutorial 2: The "walking skeleton"
- Networking tutorial 3: Login 1 - The game client
- Networking tutorial 4: Login 2 - gateway and authentication server
- Networking tutorial 5: Login 3 - world server
- Networking tutorial 6: Encrypted connections using DTLS
I really thought long about the correct approach for this tutorial. Finally there are different possibilities, if one would like to develop, as here, the currently planned four components. An extreme case would be to develop per tutorial one component completely and thereby to enable the communication between the components only at the end. I decided for another variant and set up all components directly without real functionality, in order to fill them afterwards in each tutorial with further contents.
This approach is also called Walking Skeleton. The term was probably coined at the end of the 1990s by Alistair Cockburn, one of the pioneers of agile software development. Unfortunately, his website is under reconstruction at the time of writing this article, but thanks to the Wayback Machine, I found the quote I was looking for about the Walking Skeleton:
A Walking Skeleton is a tiny implementation of the system that performs a small end-to-end function. It need not use the final architecture, but it should link together the main architectural components. The architecture and the functionality can then evolve in parallel.
The first step to the walking skeleton is to create all necessary projects. So in our case it is the four Godot projects “Authentication Server”, “Gateway Server”, “World Server” and “Game Client”. Since the server projects are all planned as headless projects, i.e. without a graphical component, they use Compatibility as renderer, while the game client uses Forward+, but the renderer doesn’t really matter for this tutorial series. Theoretically, it is also possible to realize all subcomponents within one Godot project, but modularization makes it not only clearer, but also safer, since the client contains only the information it needs.
To start the servers headless in the editor, you have to enter the value --display-driver headless in Project Settings -> Editor -> Main Run Args.
General project structure
So that the projects can communicate error-free by network, the SceneTrees of the involved parties must be identically structured. The easiest way to achieve this is to build the projects as identically as possible, so I use the following project structure here:
.
├── scenes
│   ├── network
│   │   ├── authentication_server.gd
│   │   ├── gateway_server.gd
│   │   └── world_server.gd
│   ├── main.gd
│   └── main.tscn
└── icon.svg
Which scripts are present within the “network” folder depends obviously on which server functionality is provided or with which server the respective project is supposed to communicate. If you recall the planned architecture from the last article and look at the communication paths, you come to the following scripts:
- Authentication Server
authentication_server.gd- Gateway Server
authentication_server.gd,gateway_server.gd- World Server
world_server.gd- Game Client
authentication_server.gd,world_server.gd
The server base
We start with the following basic framework for the servers:
 1extends Node
 2
 3@export_range(1025, 65536) var network_port := 1911
 4@export_range(2, 4095) var max_clients := 2
 5
 6
 7func startup() -> void:
 8	var network := ENetMultiplayerPeer.new()
 9	var ret := network.create_server(network_port, max_clients)
10	if ret == OK:
11		get_multiplayer().set_multiplayer_peer(network)
12		print("Server started on port %d, allowing max %d connections"
13				% [network_port, max_clients])
14
15		network.peer_connected.connect(
16			func(client_id: int) -> void:
17				print("Client %d connected" % client_id)
18				)
19		network.peer_disconnected.connect(
20			func(client_id: int) -> void:
21				print("Client %d disconnected" % client_id)
22				)
23	else:
24		print("Error while starting server: %d" % ret)
25		get_tree().quit(ret)
In lines 3 and 4 the configurable parameters are exported. So you can also adjust them directly in the editor. It is important that each server gets its own network port. In the function startup() the ENet server is started. For this we first create a new object of the type ENetMultiplayerPeer in line 8, in order to start the ENet server with it in line 9. If this was successful, we store our started ENet server in our current MultiplayerAPI object, print a short success message and then link the signals to see when someone has connected or disconnected (lines 11-22). For the start we use simple lambdas, which currently only output log messages. If something went wrong when the server was started, we output an error message and then terminate the process (lines 23-24).
The start scene of the server
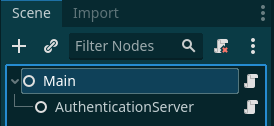
SceneTree of Authentication Server.
main.tscn is used in all projects as start scene and either starts the respective network components or acts in the client as SceneHandler, which serves as central component for the management of scenes and (network) resources. Therefore the structure of main.tscn on the server can be kept simple. As shown in the picture, it is a Node named “Main” with Nodes for each network component that have the associated network script associated with them. For the Authentication Server, it then looks like this:
1extends Node
2
3@onready var authentication_server := $AuthenticationServer
4
5
6func _ready() -> void:
7	get_tree().set_multiplayer(SceneMultiplayer.new(),
8		^"/root/Main/AuthenticationServer")
9	authentication_server.startup()
If you have experience with Godot 3.x, lines 7-8 will probably look a bit unusual. With Godot 4 custom_multiplayer was removed and instead the function set_multiplayer in the SceneTree was extended so that you can now store different MultiplayerAPI objects depending on the NodePath to be able to operate/use more than one network component. This is not really necessary in the authentication server, because it has only one network component, but in my experiments I found that it led to communication problems between gateway and authentication server if the authentication server was not configured in this way.
The other two servers are built in a similar way. For the gateway server we use the network port 1910 and for the world server 1909. The previous source code is of course also mapped in the GitHub repository. In the next article we will start to implement the login process of the game client.