A few days ago there was a discussion in the official Godot Discord server about how to manage to synchronize materials over the network. To understand the problem a bit better, I should perhaps first explain that you cannot transfer every datatype via RPC or MultiplayerSynchronizer over the network, but only scalar datatypes. Scalar datatypes generally include all datatypes that can contain only a single value, such as int, float, Bool, String or StringName.
Generally the whole topic is called serialization and it is about reading the variables or partly also objects from the memory and transforming them in such a way that variables / objects of the original type can be created again with identical contents. Serialization is therefore not only relevant for network transfers, but is also required when you want to save the game state, for example.
The Idea
Immediately after reading the question I also had already an idea how to solve the problem. But to really make sure that this idea works, I extended the old known tutorial project so that the clients can switch between three different materials with the tab key and all other clients get this material switch synchronized as well.
Strictly speaking it works a little bit different in practice:
- There is an enum
SupportedColorswhich holds a value for all player materials. (player.gd) - There is a dictionary
colorToMaterial, which maps all enum values to the corresponding stored materials. (player.gd) - The player gets a property
currentColorof typeSupportedColors,- which always contains the enum value of the currently displayed material. (
player.gd) - which in the setter, i.e. when the color is changed, replaces the material of the player mesh with the material from
colorToMaterial. (player.gd) - which is synchronized by our MultiplayerSynchronizer
ServerSynchronizer(Spawn, Watch). (player.tscn)
- which always contains the enum value of the currently displayed material. (
- When the tab key is pressed in one of the clients, this is signaled to the server using an RPC. (
player_input.gd) - As soon as the server receives the material change request, it changes the value of
currentColor. This is synchronized to all clients in range, calling their respective setters, which resulates in the material change of the game character mesh. (player.gd)
The Practice
But enough of theory, as much as I like it, sometimes source code is more convincing. Before we can start, a few materials have to be created. For this example I have created three standard materials (StandardMaterial3D), for each of which I have set the albedo color (albedo_color) to red, green and blue respectively and saved them. With this preparation we can now start with the extension of the player (player.gd):
ToDo 1 and 2
Items 1 and 2 are implemented relatively quickly and should need no further words:
 6const colorToMaterial: Dictionary = { SupportedColors.GREEN: preload("res://materials/green.tres"),
 7										SupportedColors.BLUE: preload("res://materials/blue.tres"),
 8										SupportedColors.RED: preload("res://materials/red.tres"),
 9										}
10
11enum SupportedColors { GREEN, BLUE, RED}
ToDo 3
Then we take care of items 3.1 and 3.2 by creating our property currentColor and writing the corresponding setter:
21@export var currentColor : SupportedColors = SupportedColors.GREEN:
22	set(color):
23		currentColor = color
24		if is_ready:
25			mesh.surface_set_material(0, colorToMaterial[currentColor])
26
27@onready var mesh: Mesh = $MeshInstance3D.mesh
The is_ready property is just to prevent us from setting the material before we have access to the mesh. For this to work, we need two more lines:
32var is_ready := false
33
34func _ready() -> void:
35	is_ready = true
36	if player == multiplayer.get_unique_id():
37		$Camera3D.current = true
After adding the property, we can also extend the replication configuration of our ServerSynchronizer appropriately:

Replication tab of ServerSynchronizer
ToDo 4
In implementing the RPC for item 4, I used the same mechanism as in the previous article for jumping (player_input.gd). First, we add a property representing the client’s material change request:
4@export var switch_color := falseThen we create the function that we call via RPC:
16@rpc("call_local")
17func color_switch() -> void:
18	switch_color = true
And finally, we extend our _process() function to connect the tab key to the RPC:
21func _process(delta: float) -> void:
22	direction = Input.get_vector("ui_left", "ui_right", "ui_up", "ui_down")
23	if Input.is_action_just_pressed("ui_accept"):
24		jump.rpc_id(MultiplayerPeer.TARGET_PEER_SERVER)
25	if Input.is_action_just_pressed("ui_focus_next"):
26		color_switch.rpc_id(MultiplayerPeer.TARGET_PEER_SERVER)
ToDo 5
Last but not least, the response to the material change request that will connect all our puzzle pieces (player.gd) is still missing:
40func _process(_delta: float) -> void:
41	if input.switch_color:
42		input.switch_color = false
43		match currentColor:
44			SupportedColors.GREEN:
45				currentColor = SupportedColors.BLUE
46			SupportedColors.BLUE:
47				currentColor = SupportedColors.RED
48			SupportedColors.RED:
49				currentColor = SupportedColors.GREEN
The final step
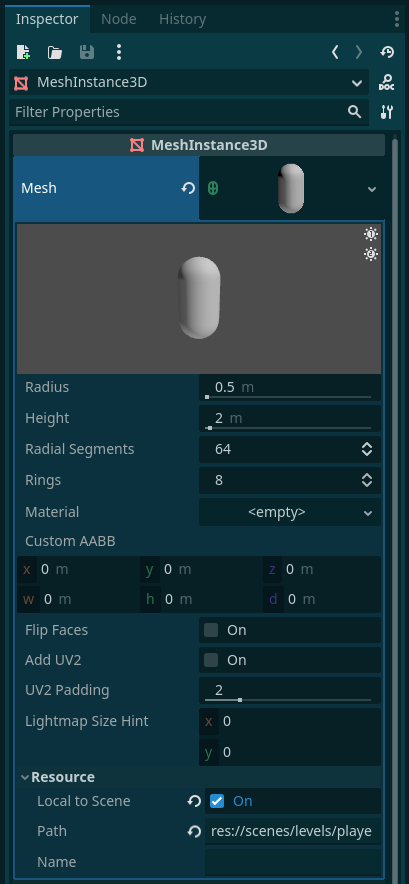
MeshInstance3D
If you want to try our previous expansion at this point, you will notice that a lot of things already work. Pressing the tab key will change the material and thus the color of the character, but at the same time the material of every other character will change as well.
This is because all scenes share the respective resources by default. If by a client the mesh material is changed, this will automatically happen for all other game characters as well, since they all use the same mesh. To change this, we still need to set a small, but crucial, hook in the mesh resource configuration, namely the one behind “Local to Scene”, as shown quite far down in the accompanying image. This causes all instances of the scene, i.e. all existing game characters, to use their own meshes.
In general, it’s a good idea for the engine to try to save as many resources as possible. Only, unfortunately, I didn’t think of this myself right away during my experiments and was already afraid that I had made programming mistakes. Through a little debugging I then realized that the source code does everything as it was intended and then fortunately I remembered that the game characters share the mesh 😓.
Conclusion
What is shown here is of course very rudimentary, but should clarify the general methodology. Of course, you can extend this as much as you like or even modify it for other use cases. For example, to offer a ColorPicker to the client, one could simply transfer the RGBA values and adjust the albedo color of the current mesh material based on them. As August Heinrich Hoffmann von Fallersleben said: “Thoughts are free, …”.
Of course you can find the complete source code in my Tutorial Repository.